
Yes, if you are logged in to PetVora. You must use the same email address for Shopify checkout as the one registered to your PetVora account. If the email addresses do not match, the payment cannot be completed successfully.
Centar za podršku
Često postavljana pitanja
Ovde možete pronaći najčešće postavljana pitanja. Ako vam je potrebna dodatna pomoć, kontaktirajte nas na support@petvora.com.
84 odgovora
PetVora Login and Shopify Checkout FAQ
6 pitanjaYes. If you are not logged in to PetVora, you can use any valid email address to purchase a product through Shopify checkout.
This does not apply to subscription plans, which require a registered PetVora account.
Yes. You must register a PetVora account before purchasing a subscription plan. At Shopify checkout, you must use the same email address as your PetVora account. If the email addresses do not match, the subscription purchase cannot be completed successfully.
That’s okay. You can register or log in to your PetVora account after payment, but you must use the same email address that you used during checkout.
No. PetVora and Shopify use separate account and verification systems.
However, when you are logged in to PetVora or purchasing a subscription plan, the email address used at Shopify checkout must exactly match your PetVora account email.
Only when purchasing a regular product without being logged in to PetVora can you check out with any valid email address.
If you are logged in to PetVora, or if you are purchasing a subscription plan, you cannot use a different email address. The Shopify checkout email must match your PetVora account email for the payment to succeed.
PetVora App
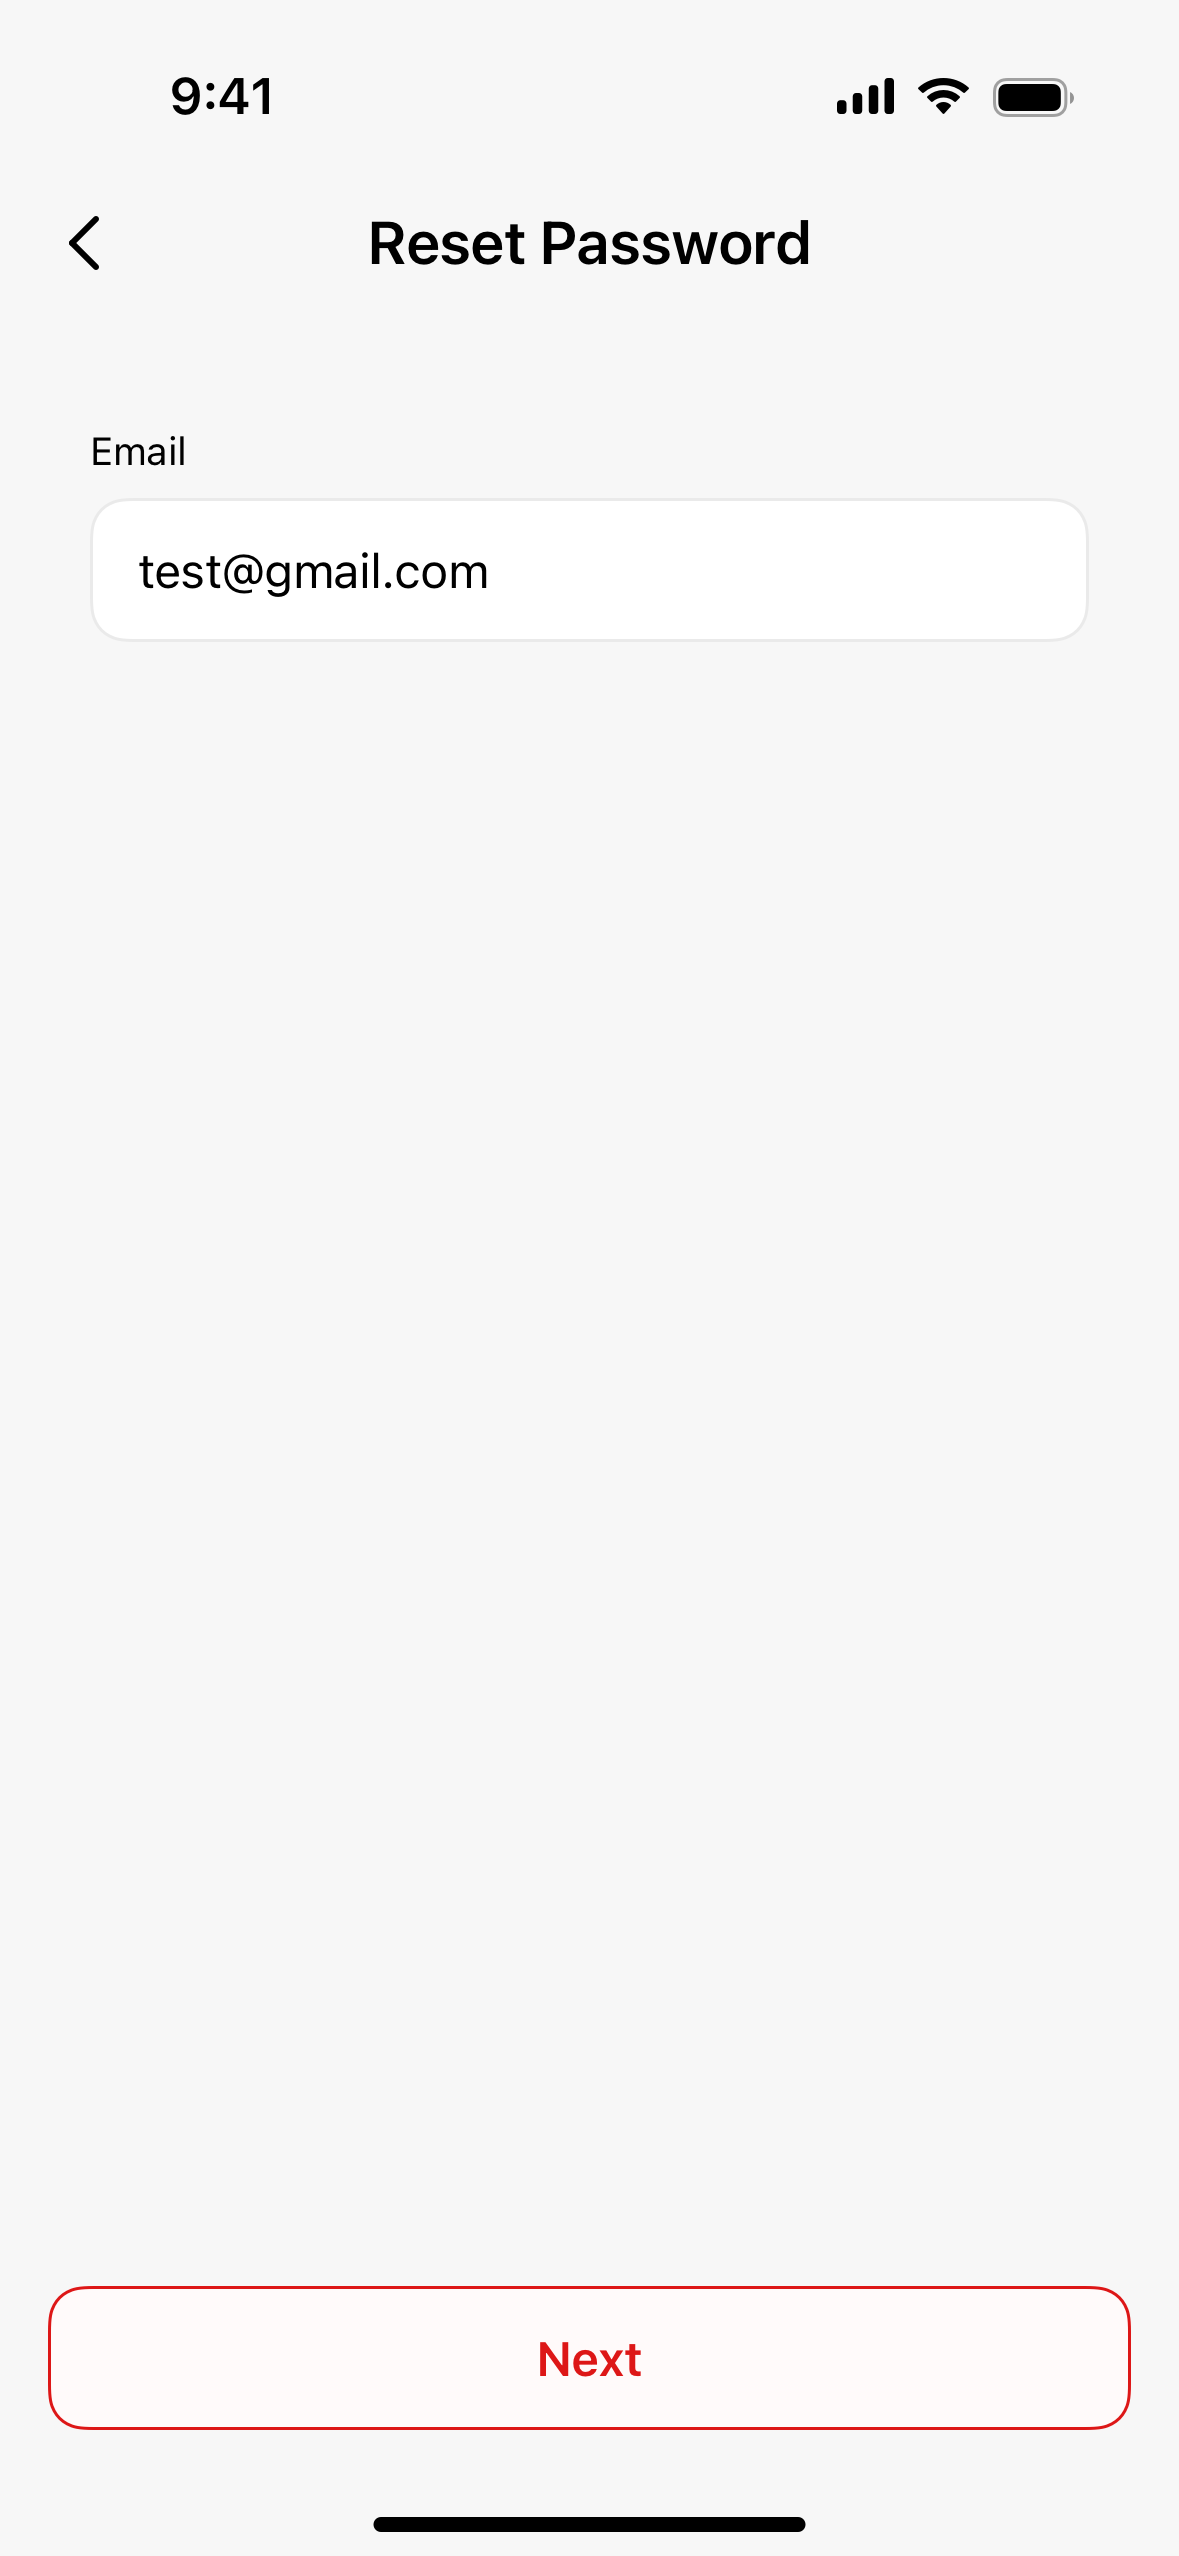
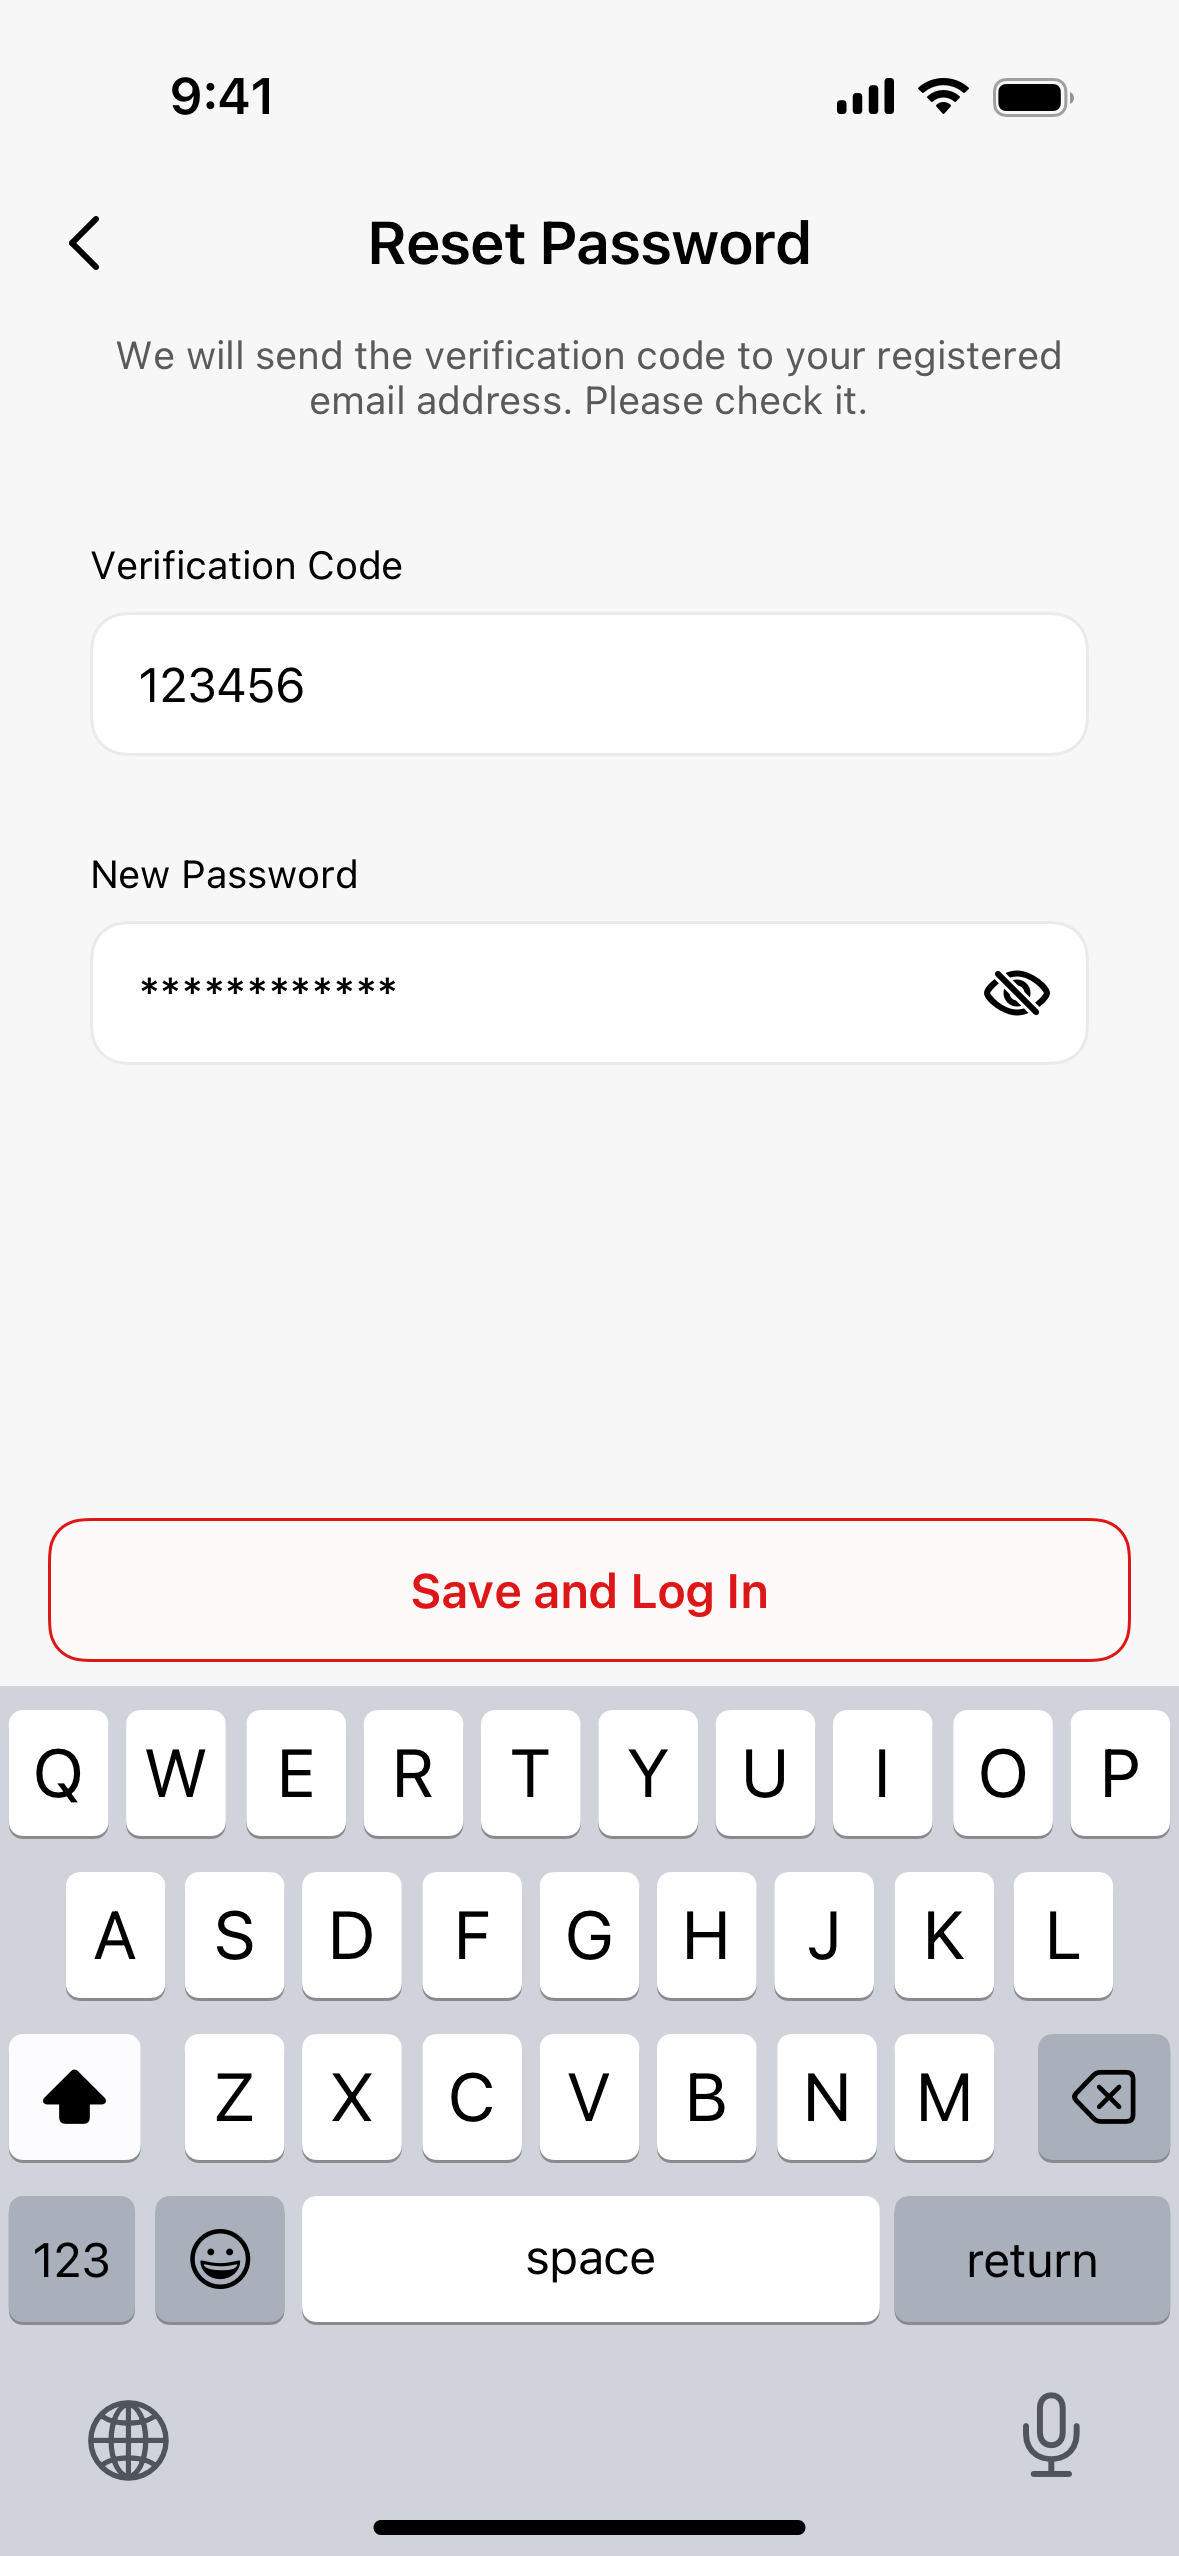
11 pitanja- Enter the app and click "Log" to log in.
- Click the "Forgot" button.
- Enter your email address.
- Enter the verification code sent to your email.
- Set a new password. Please note the following requirements:
- It must include uppercase and lowercase letters..
- It must be at least 8 characters long.
- It must include at least one special character from the list: ! @ # $ & * ~
6. Tap "Save and Log In" to complete the process.
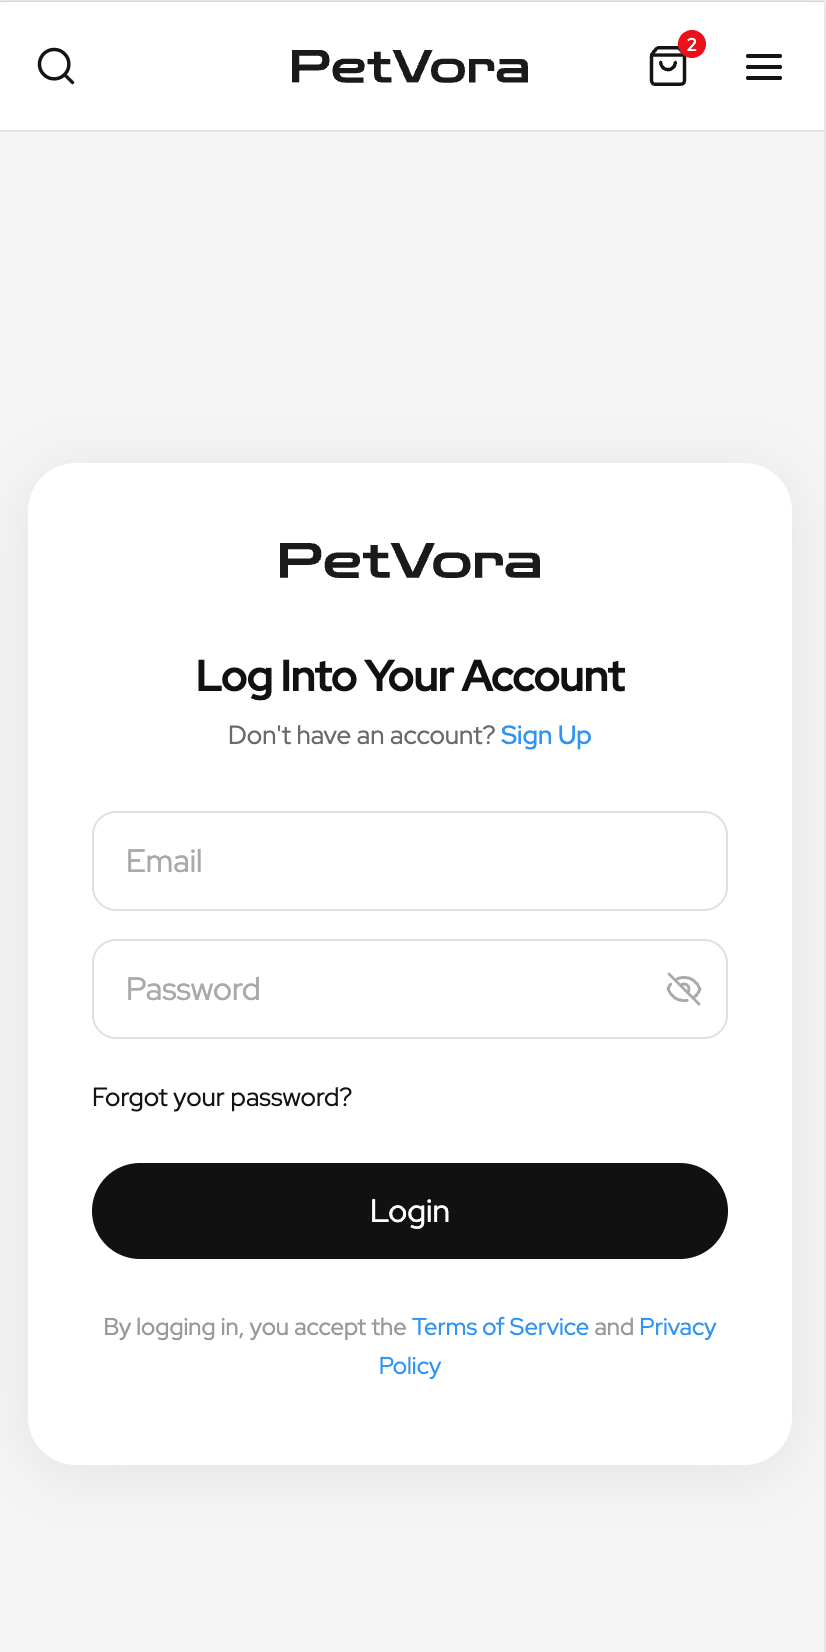
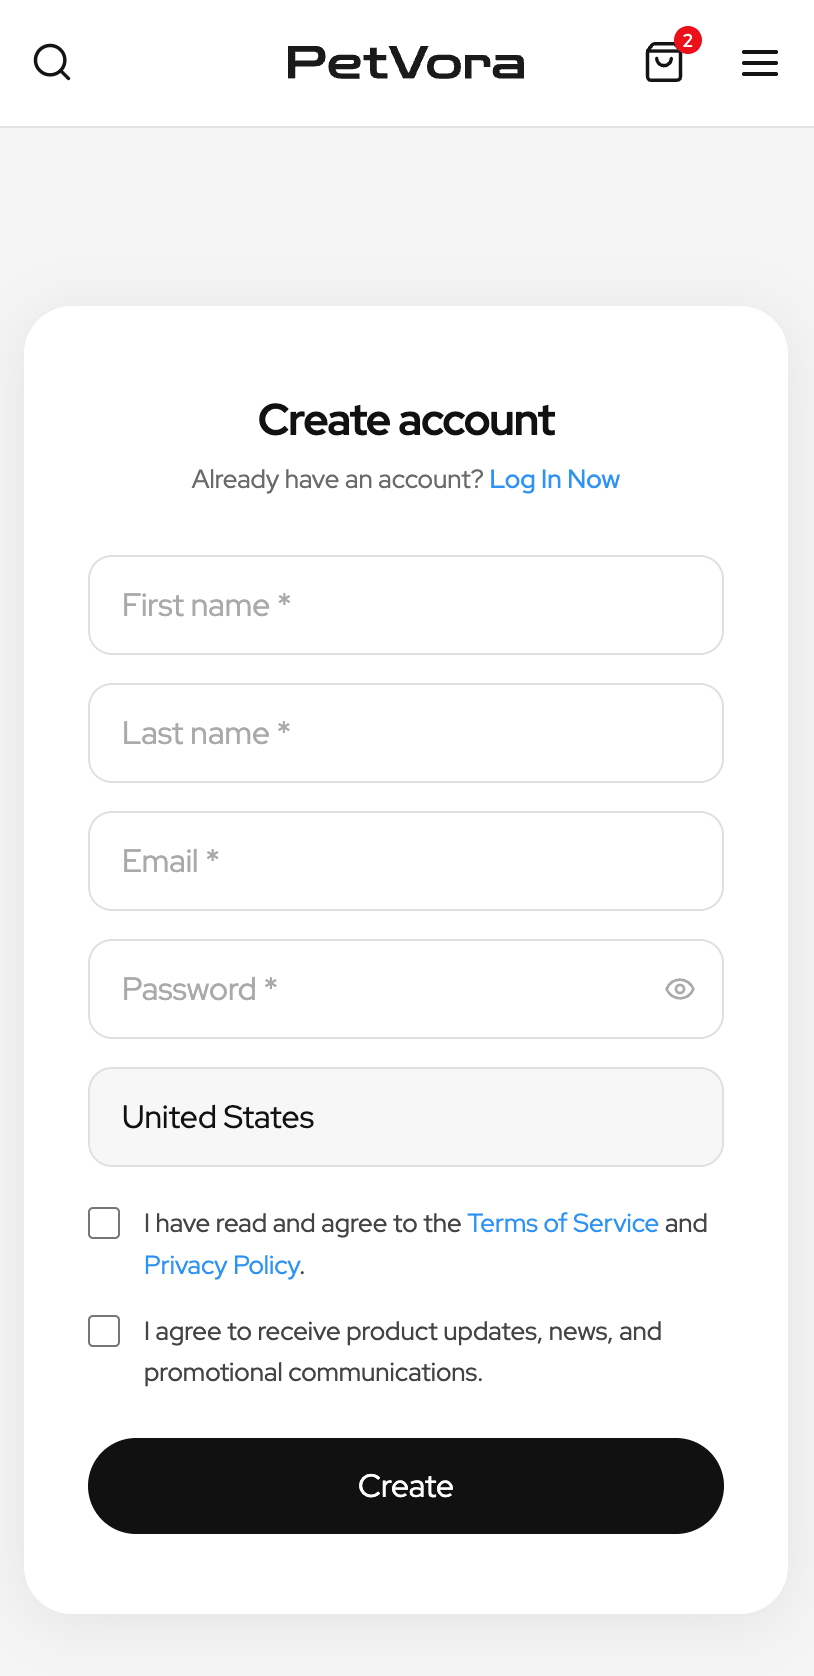
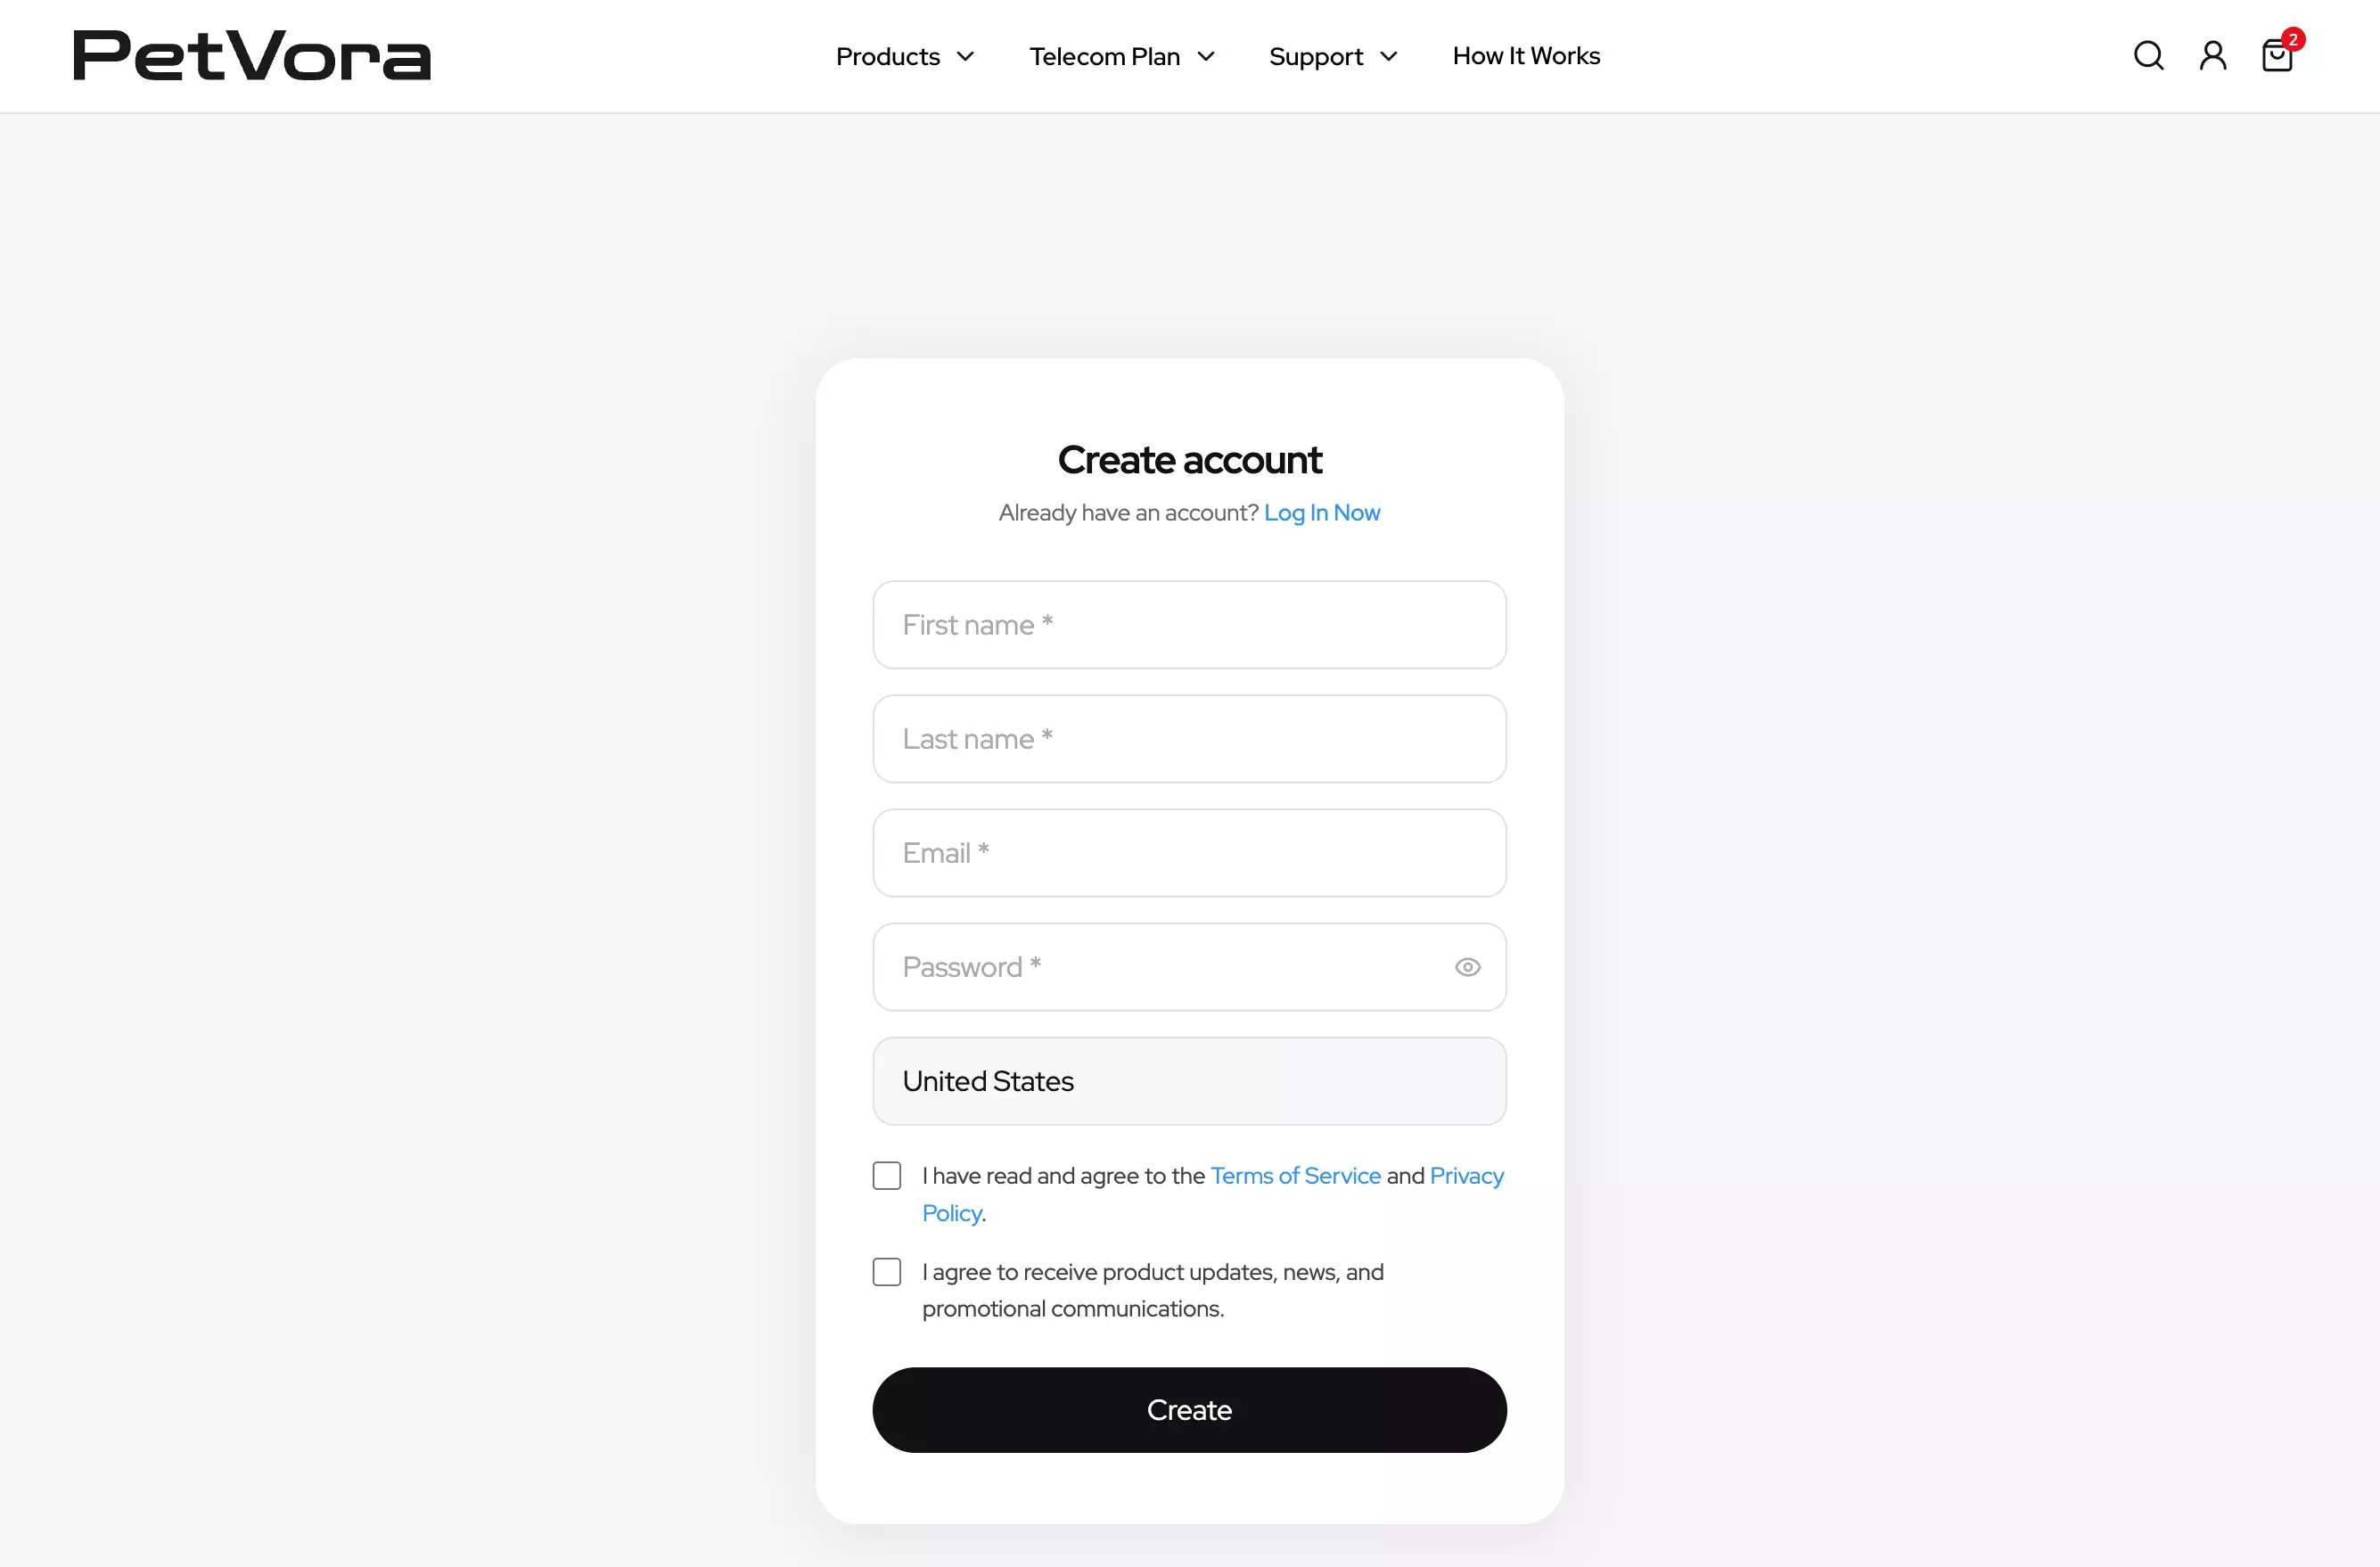
- After entering the website, click "Log in" to enter the account creation page. After entering the website login page, click "sign up" to register an account and enter your name, email address and password to register an account.
- Set your password. Please note the following requirements:
- It must include uppercase and lowercase letters.
- It must be at least 8 characters long.
- It must include at least one special character from the list: ! @ # $ & * ~
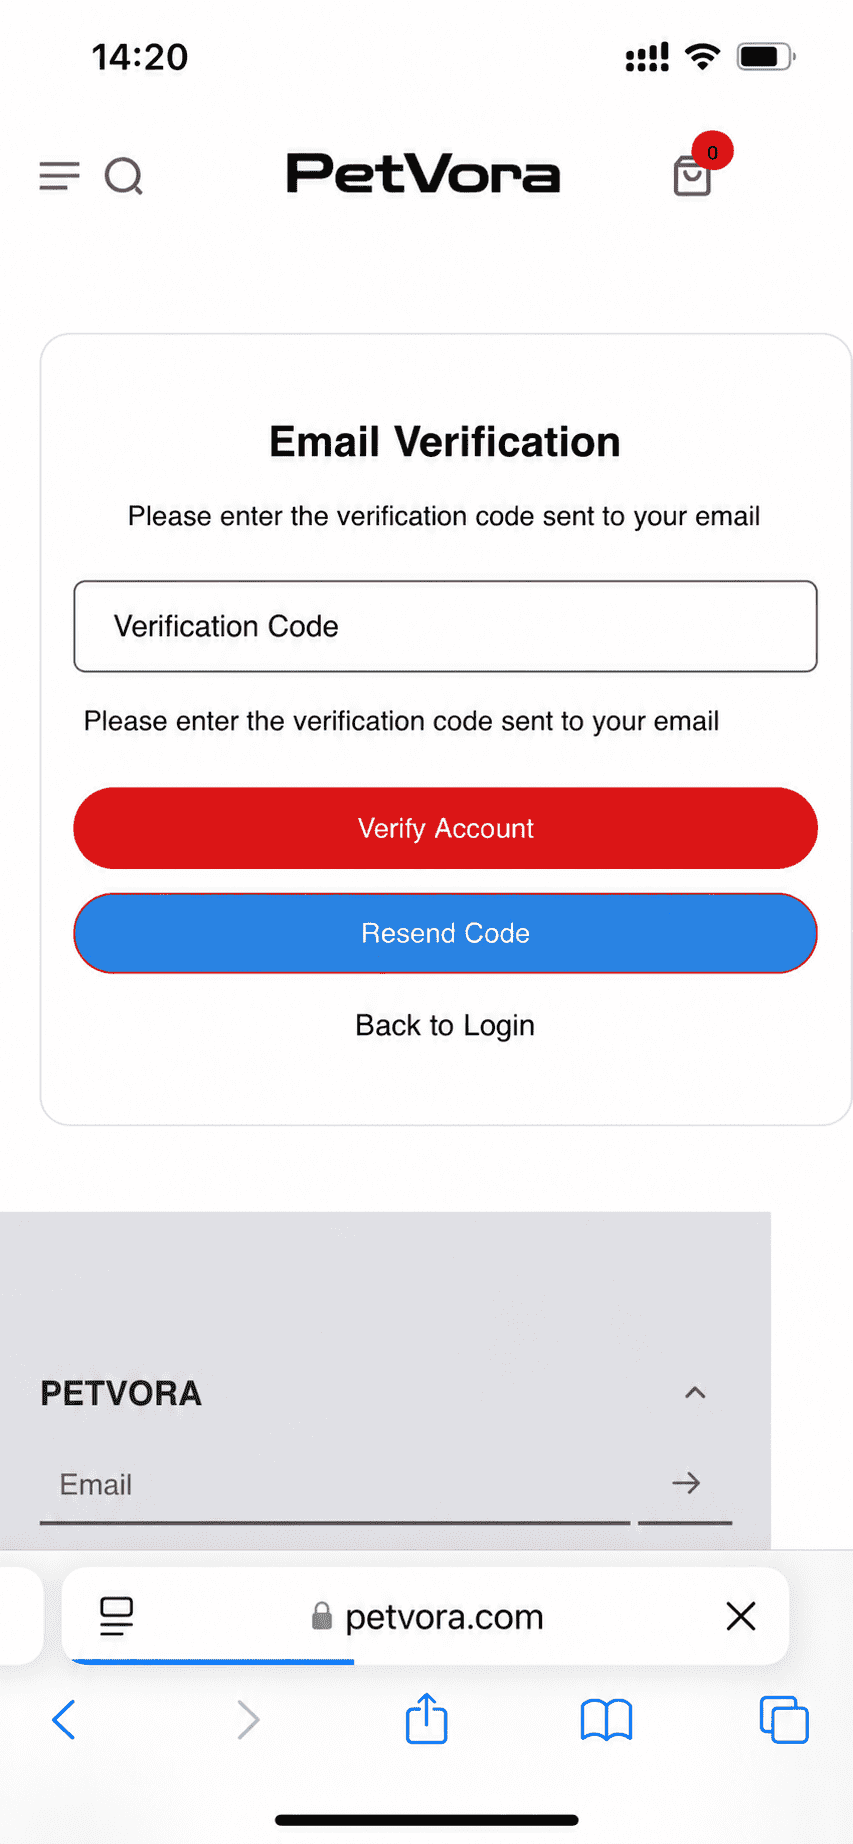
- Enter the email verification interface:
Enter the verification code sent to your email, and then click "Verify Account" to complete the registration.
- Tap "Me" in the tab bar.
- Tap your account details at the top.
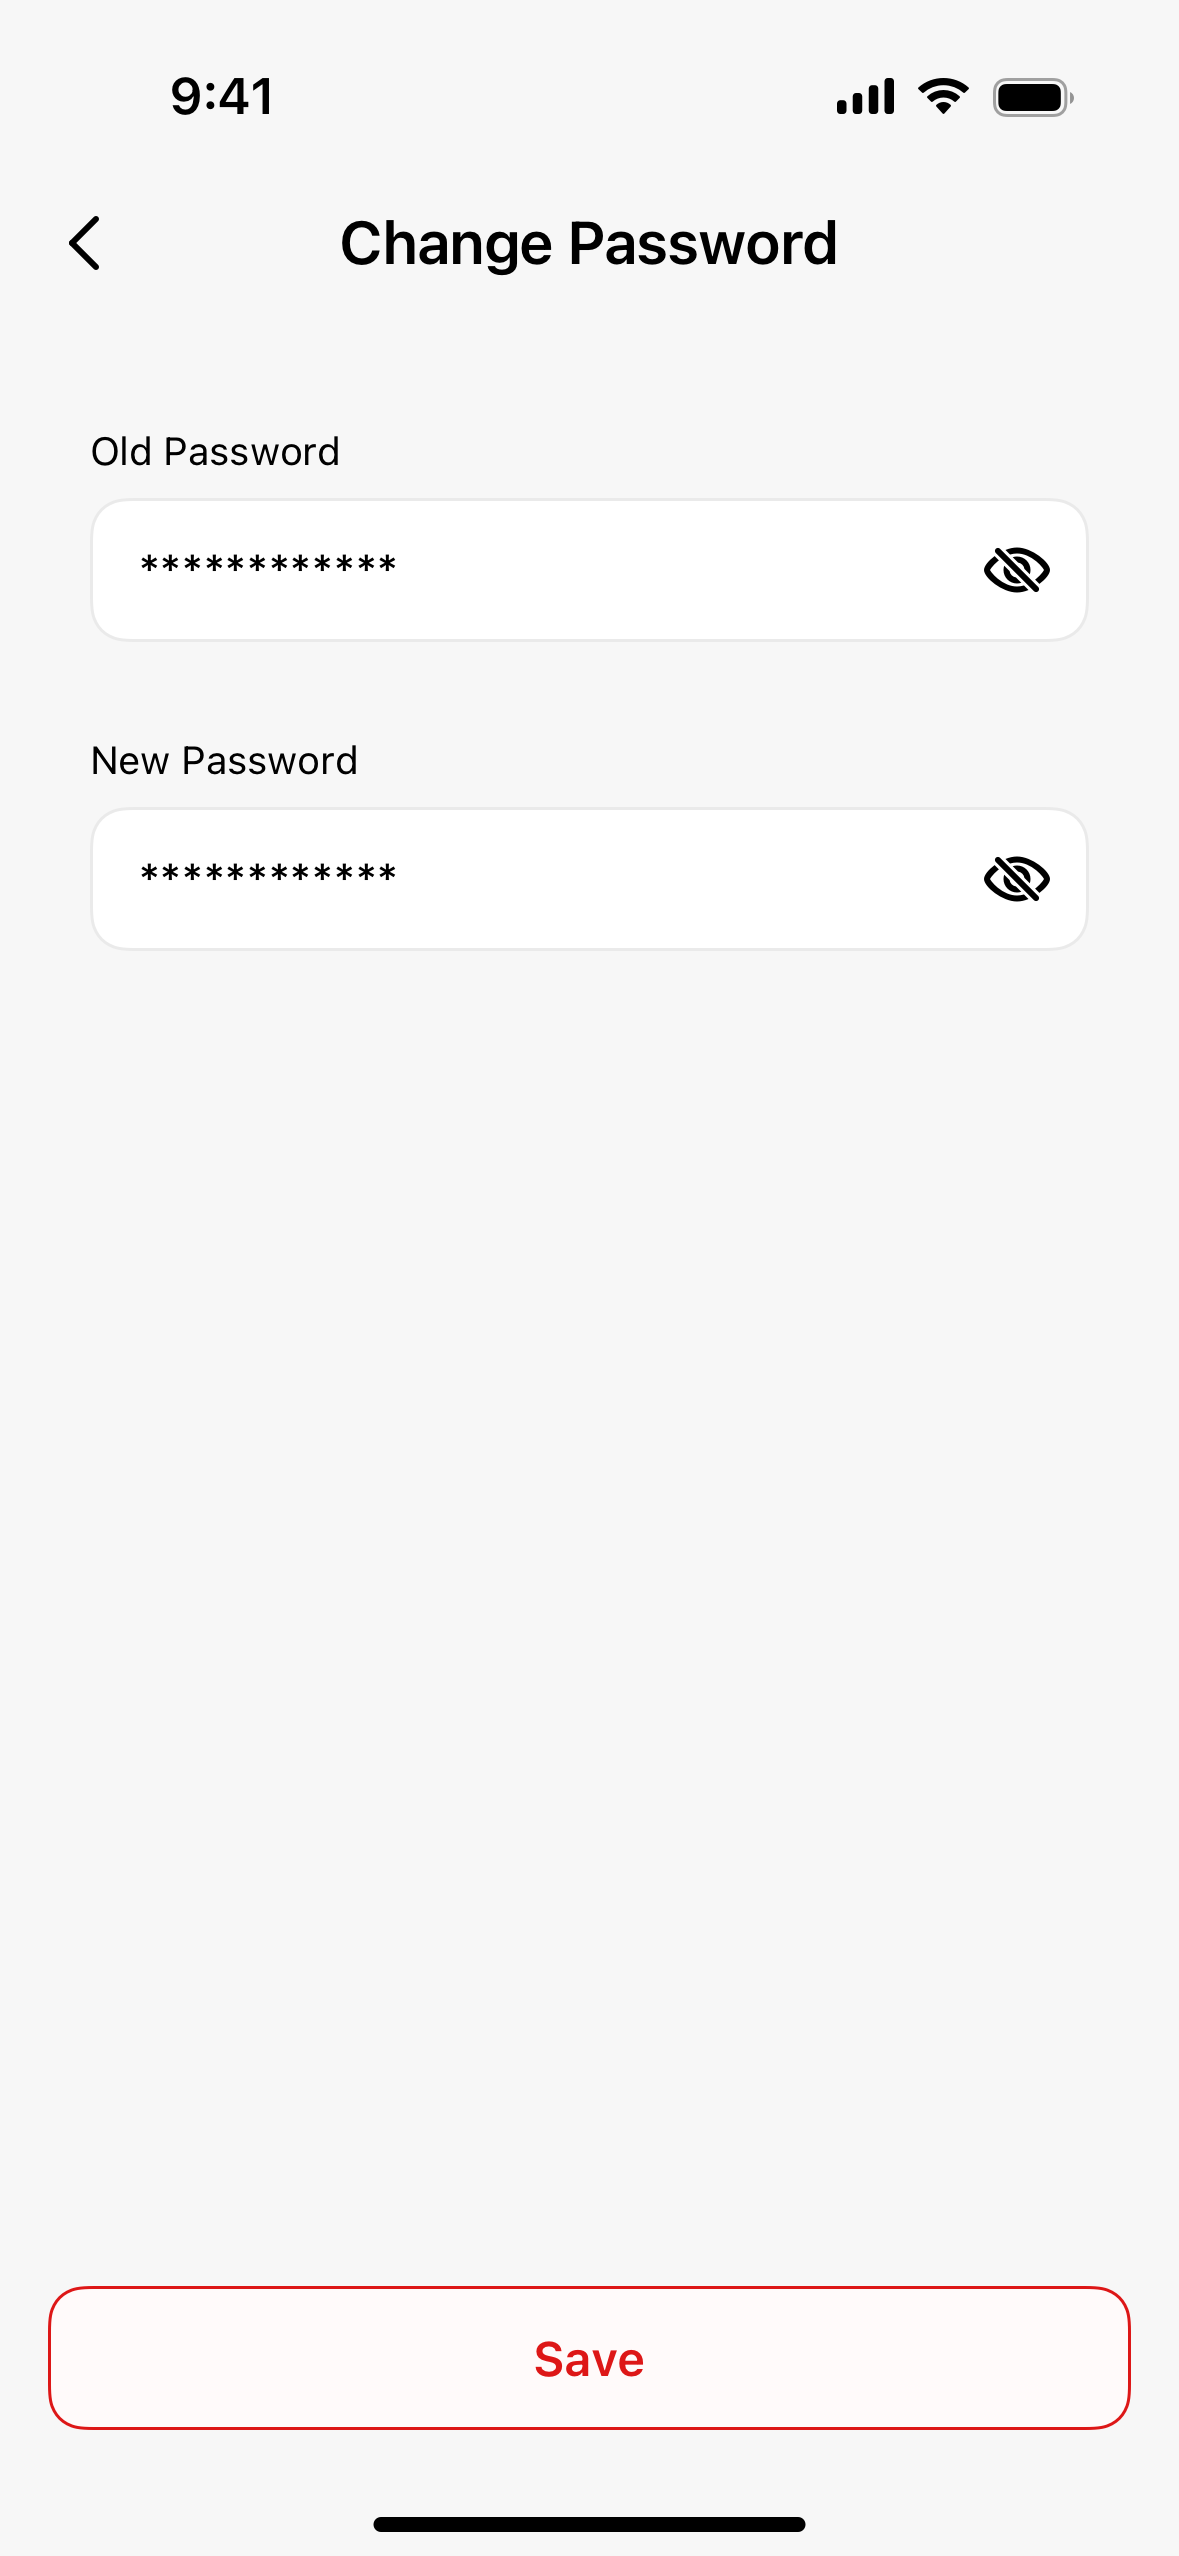
- Tap "Set" under Password Settings to go to the password change page.
- Enter your current password.
- Enter your new password.
- Tap "Save" to confirm the changes.
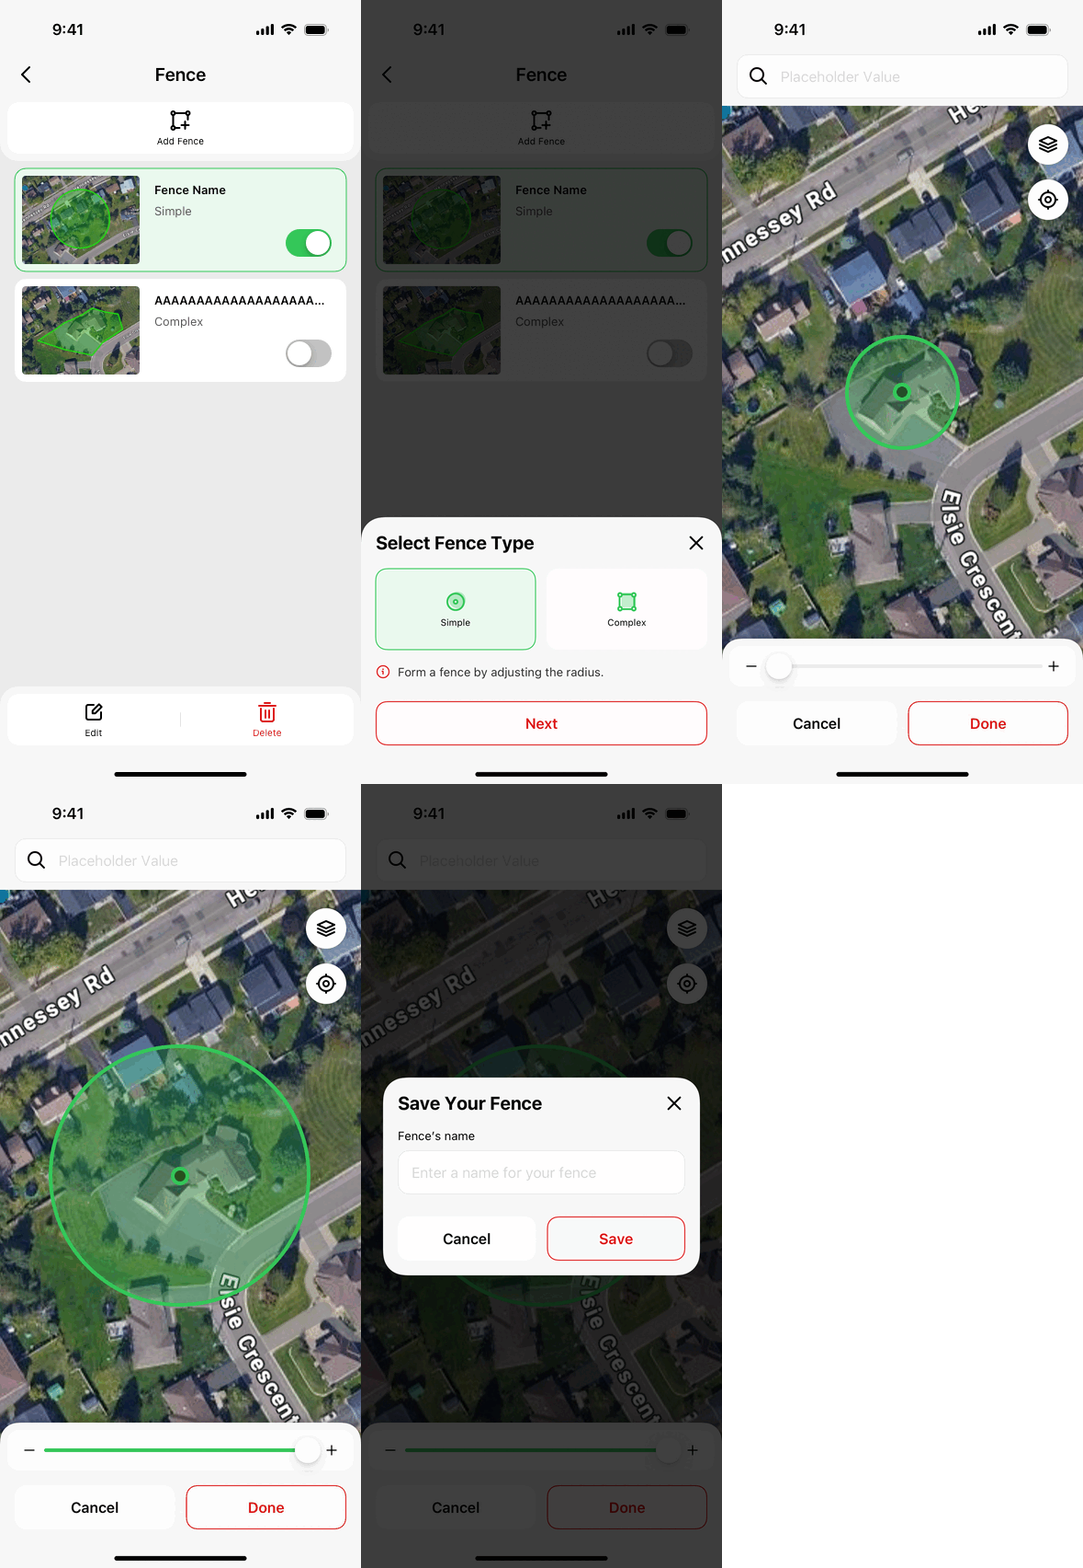
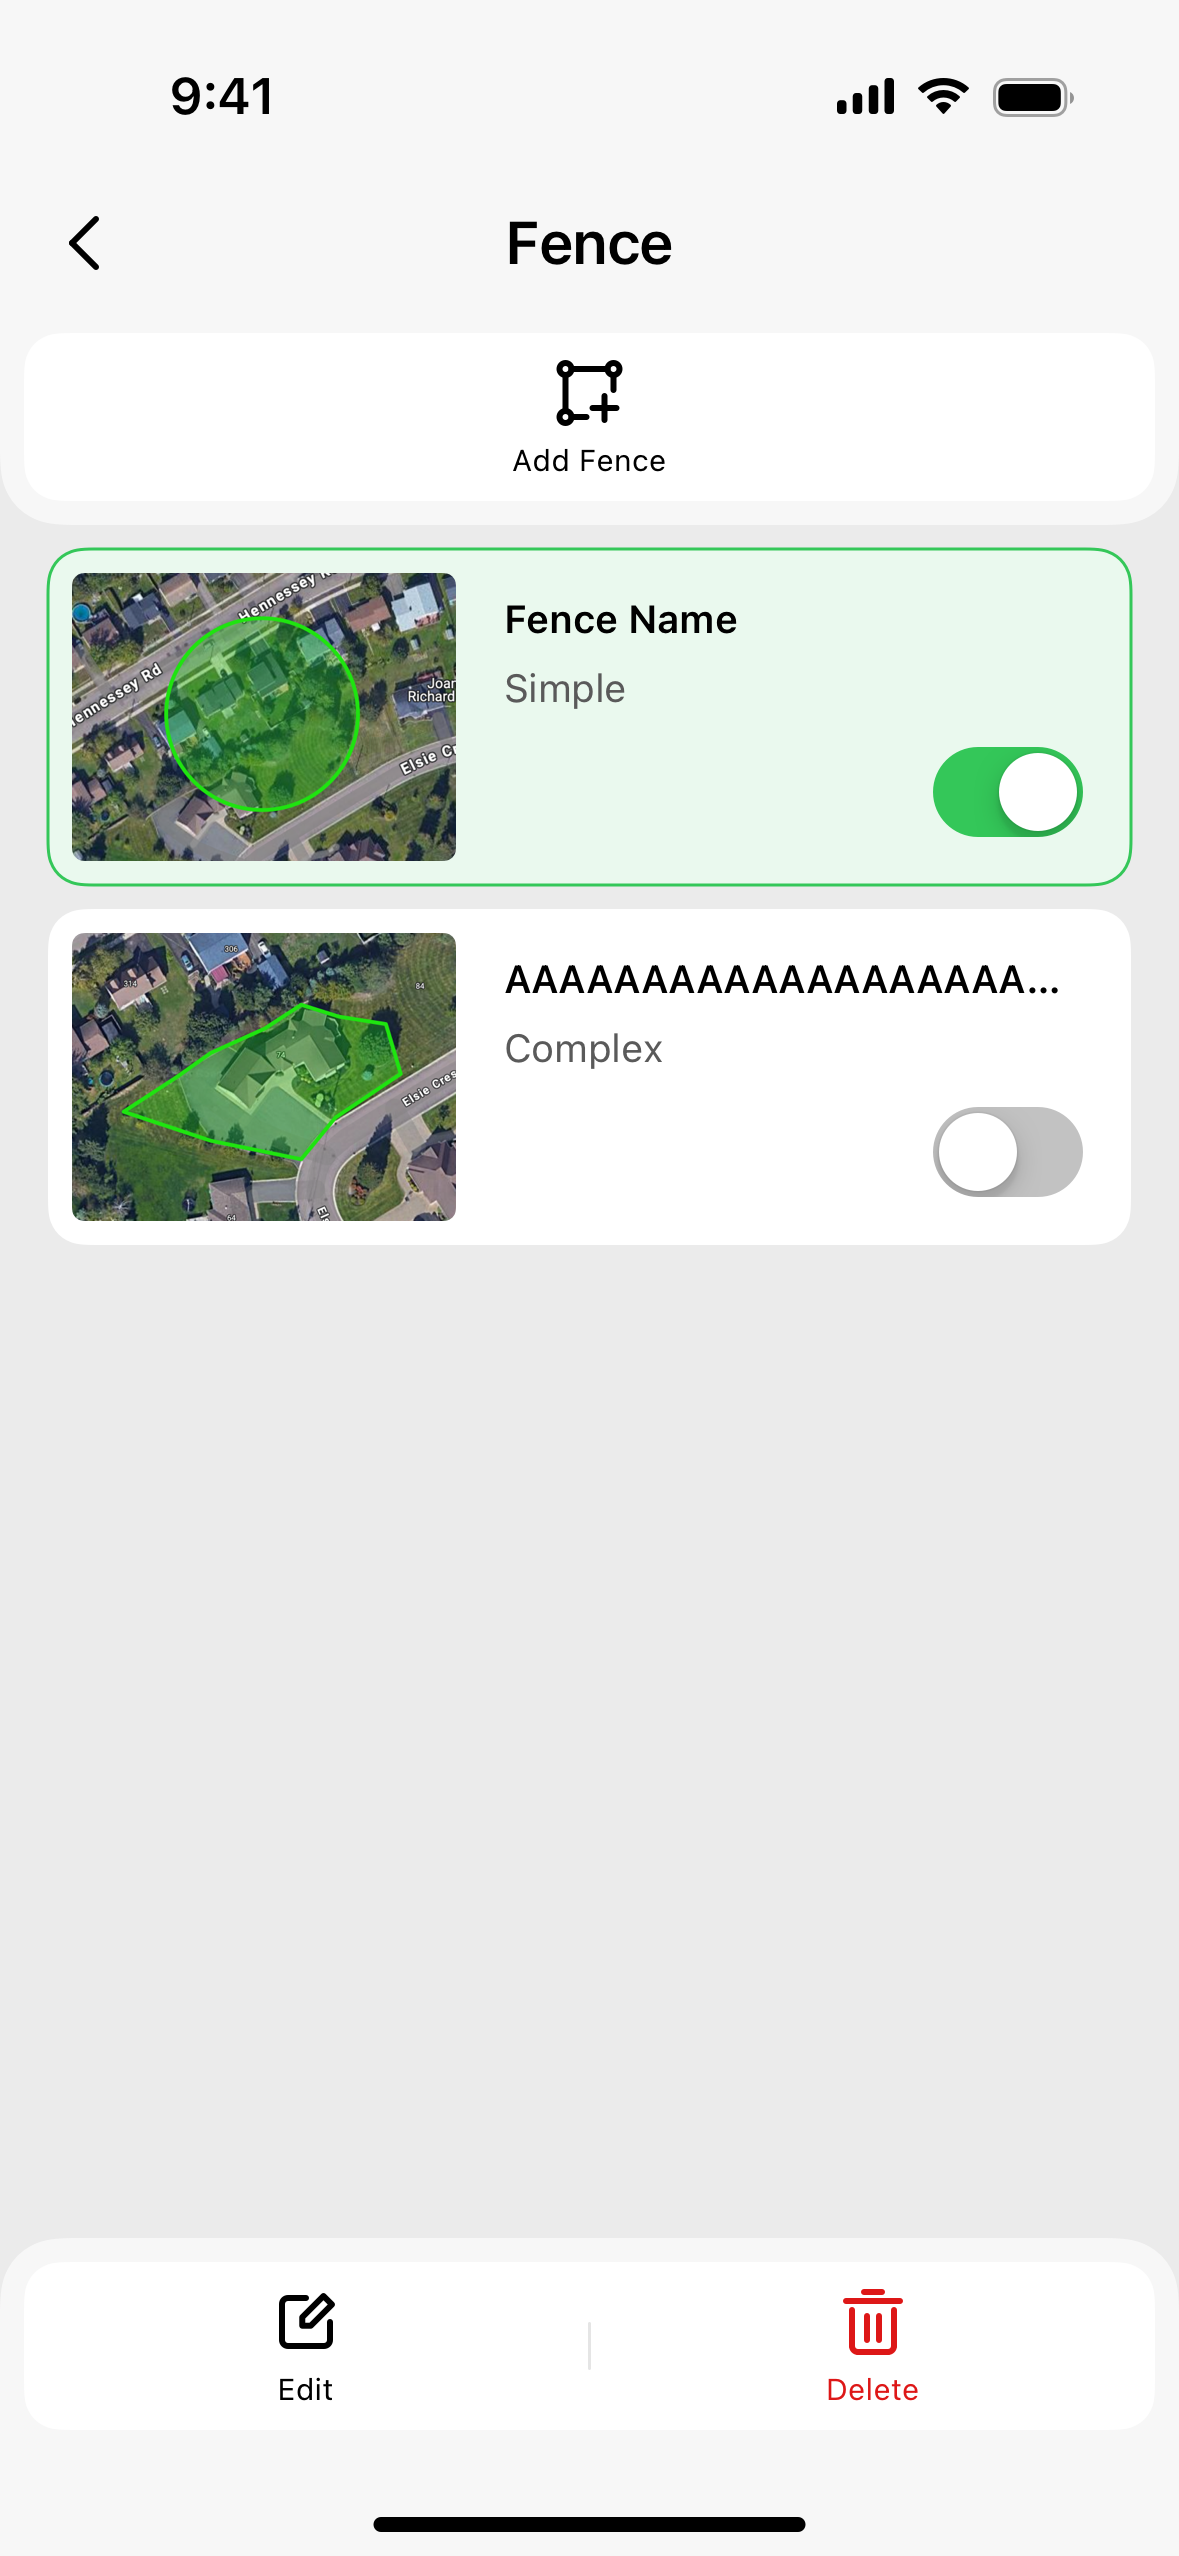
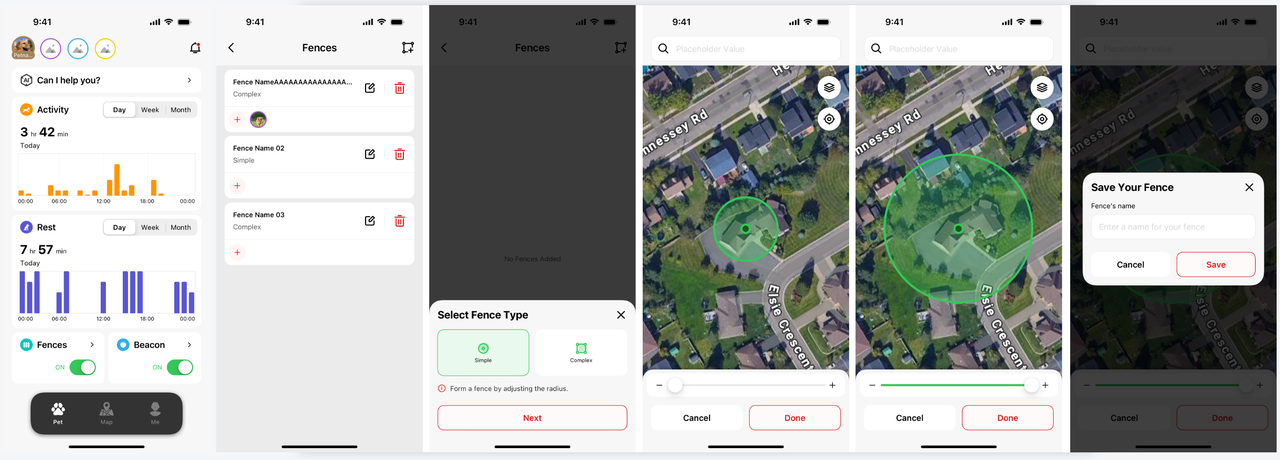
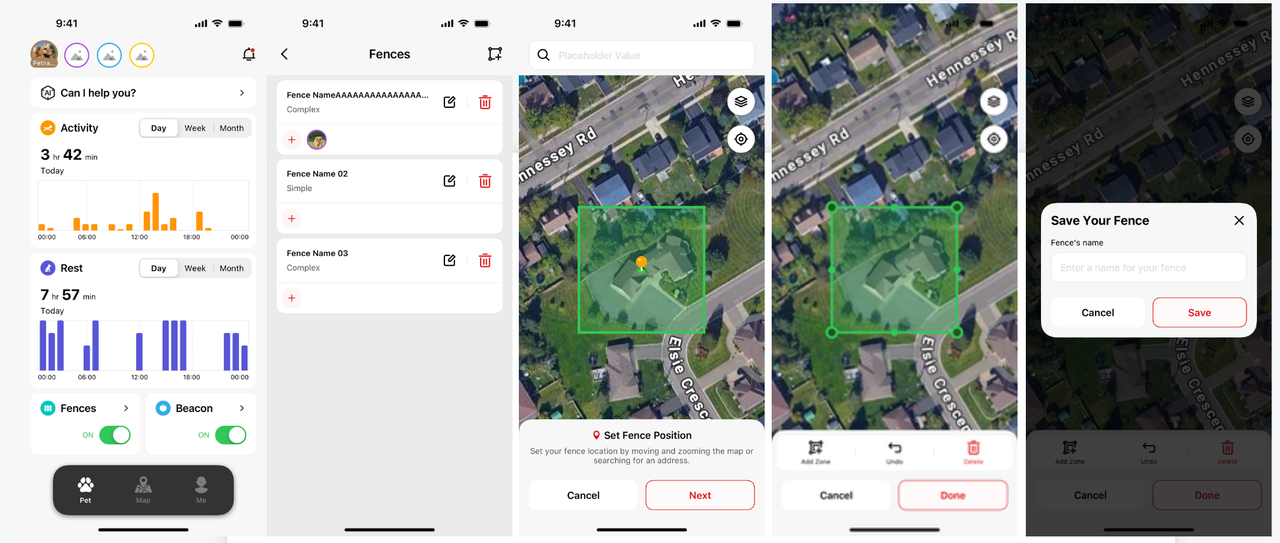
There are two ways to create a fence: Simple (circular) and Complex.
- Option 1: Open the app, go to Pet > Fence > Add Fence.
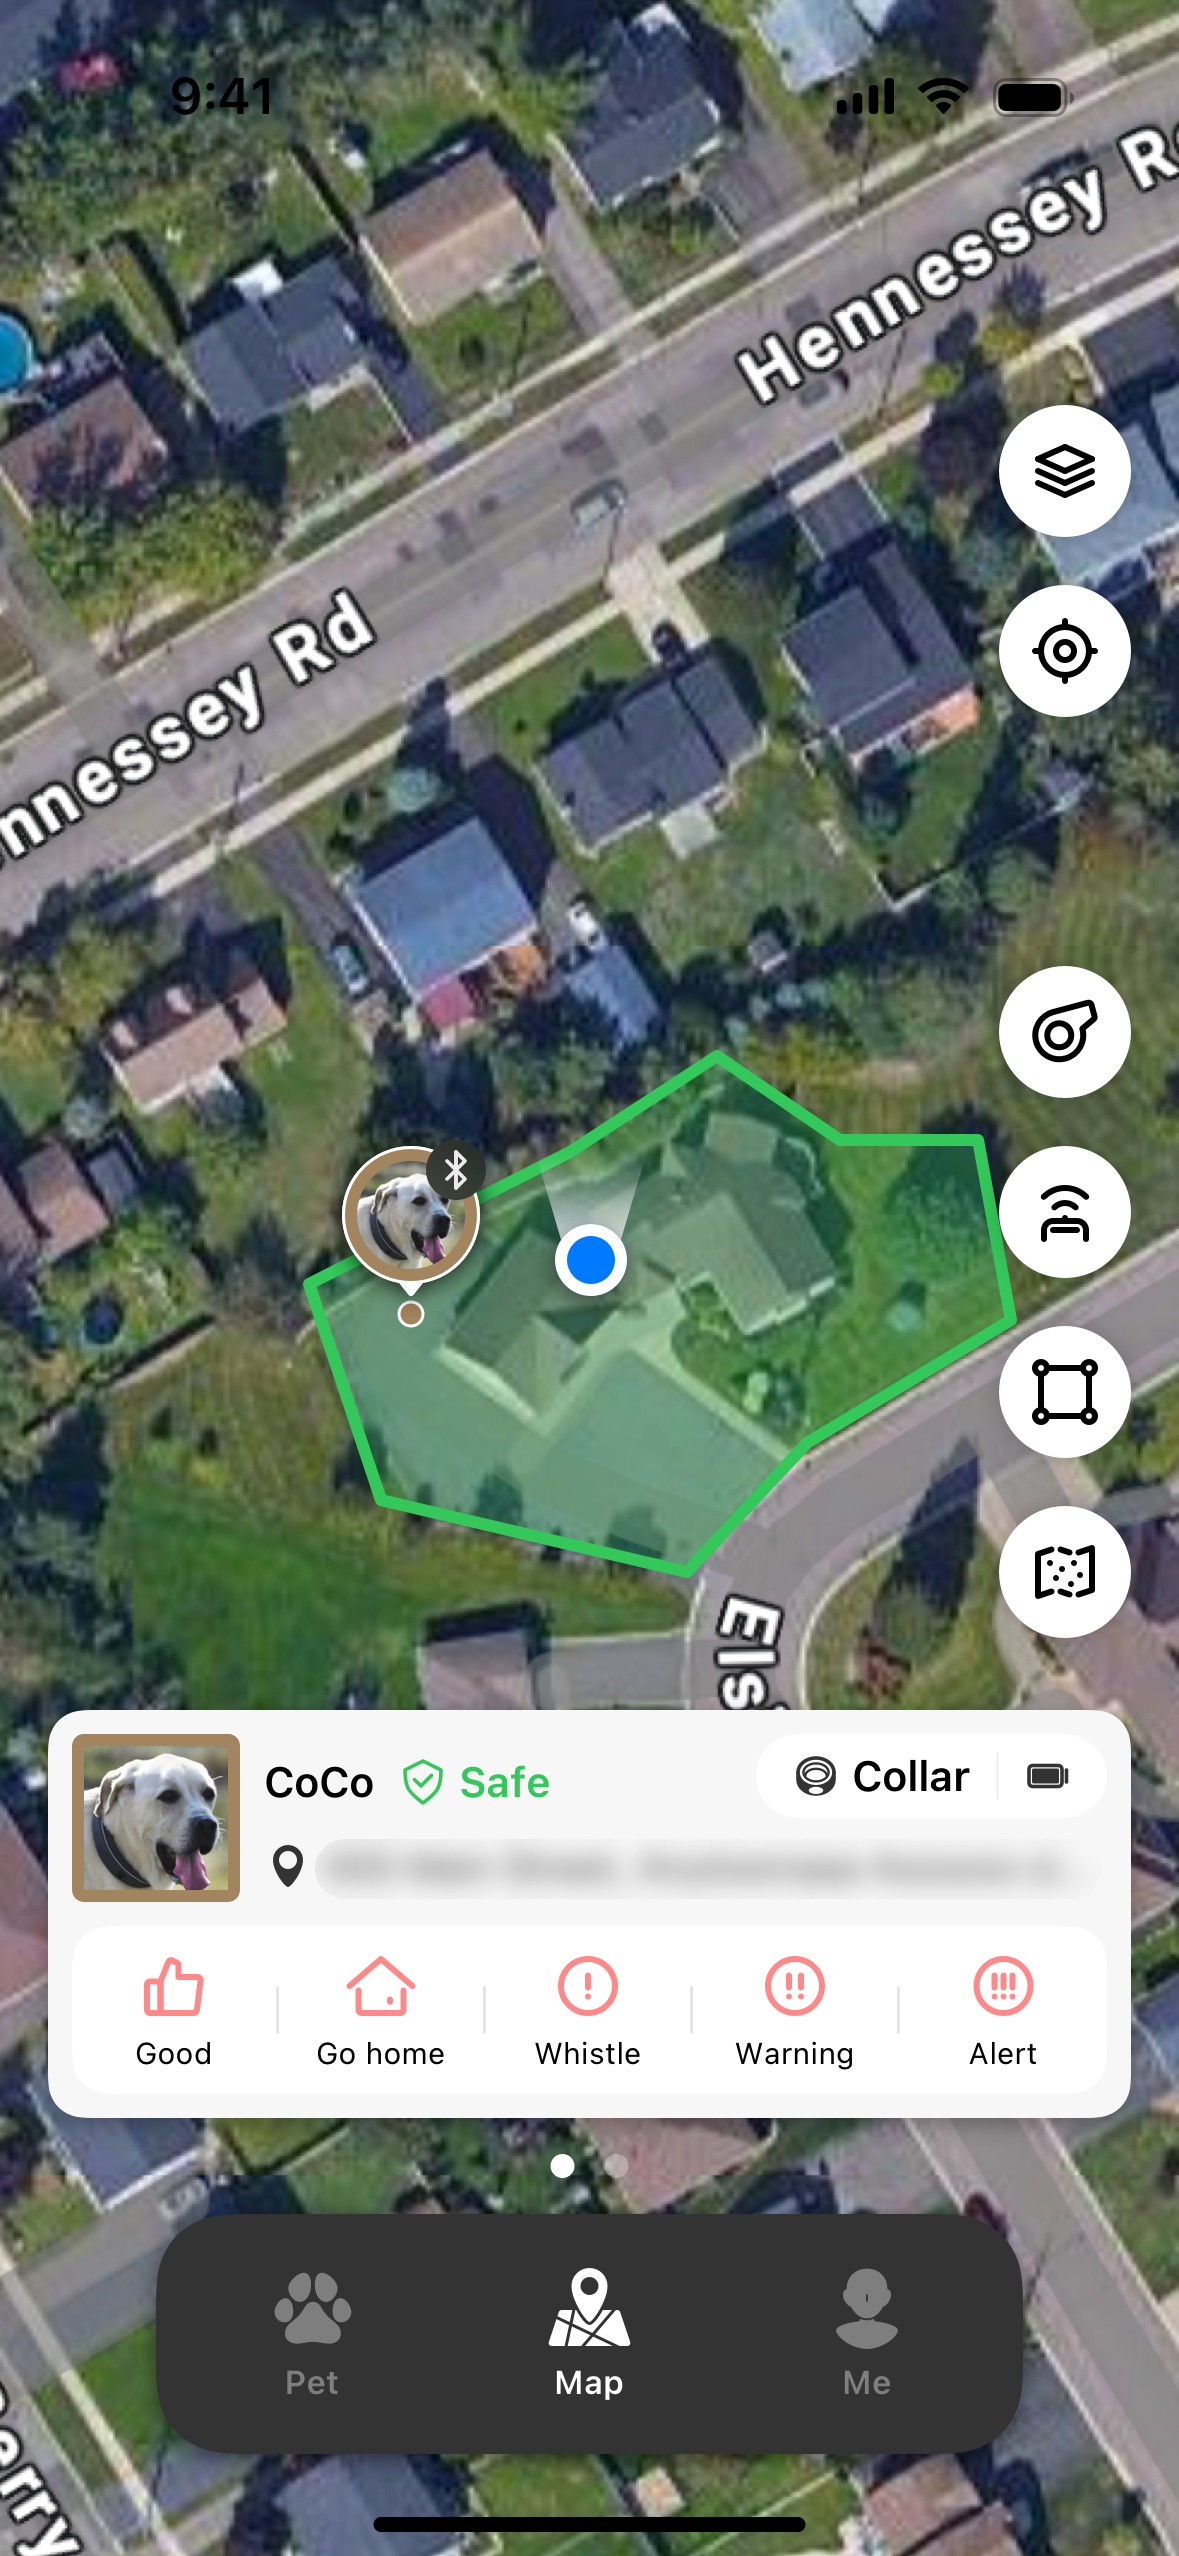
- Option 2: Open the app, go to Map > Tap the Fence Icon.
Create a Circular Fence:
- Adjust the fence size by pinching to zoom or using the slider below. You can also move the map to set the fence’s position.
- Once everything is set, tap the "Done" button, enter a name for the fence in the pop-up window, and tap "Save".
- After successfully creating the fence, it will appear in your fence list.
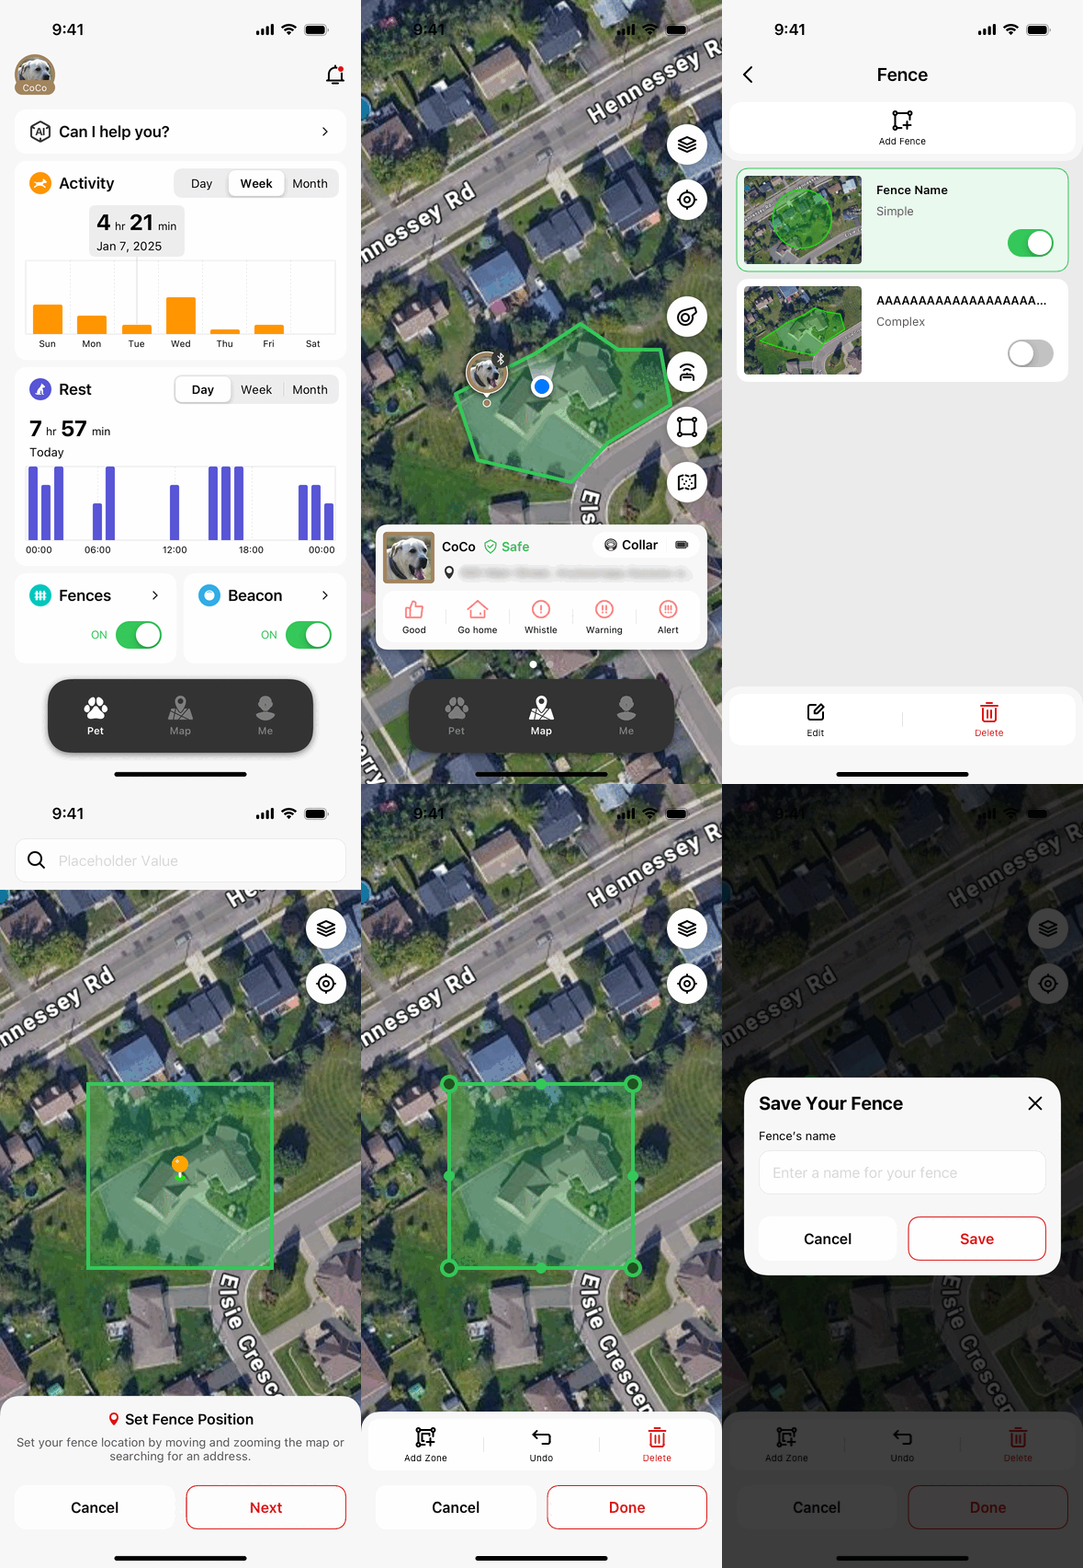
Create a Complex Fence:
- Choose the location for the fence. You can adjust it by moving the map or entering a specific address above.
- Once the location is set, adjust the fence size by zooming in or out on the map or dragging the boundary points. To move a point, press and hold it until you feel a slight vibration, then drag it to the desired position.
- When everything is set, tap the "Done" button, enter a name for the fence in the pop-up window, and tap "Save".
- After successfully creating the fence, it will appear in your fence list.
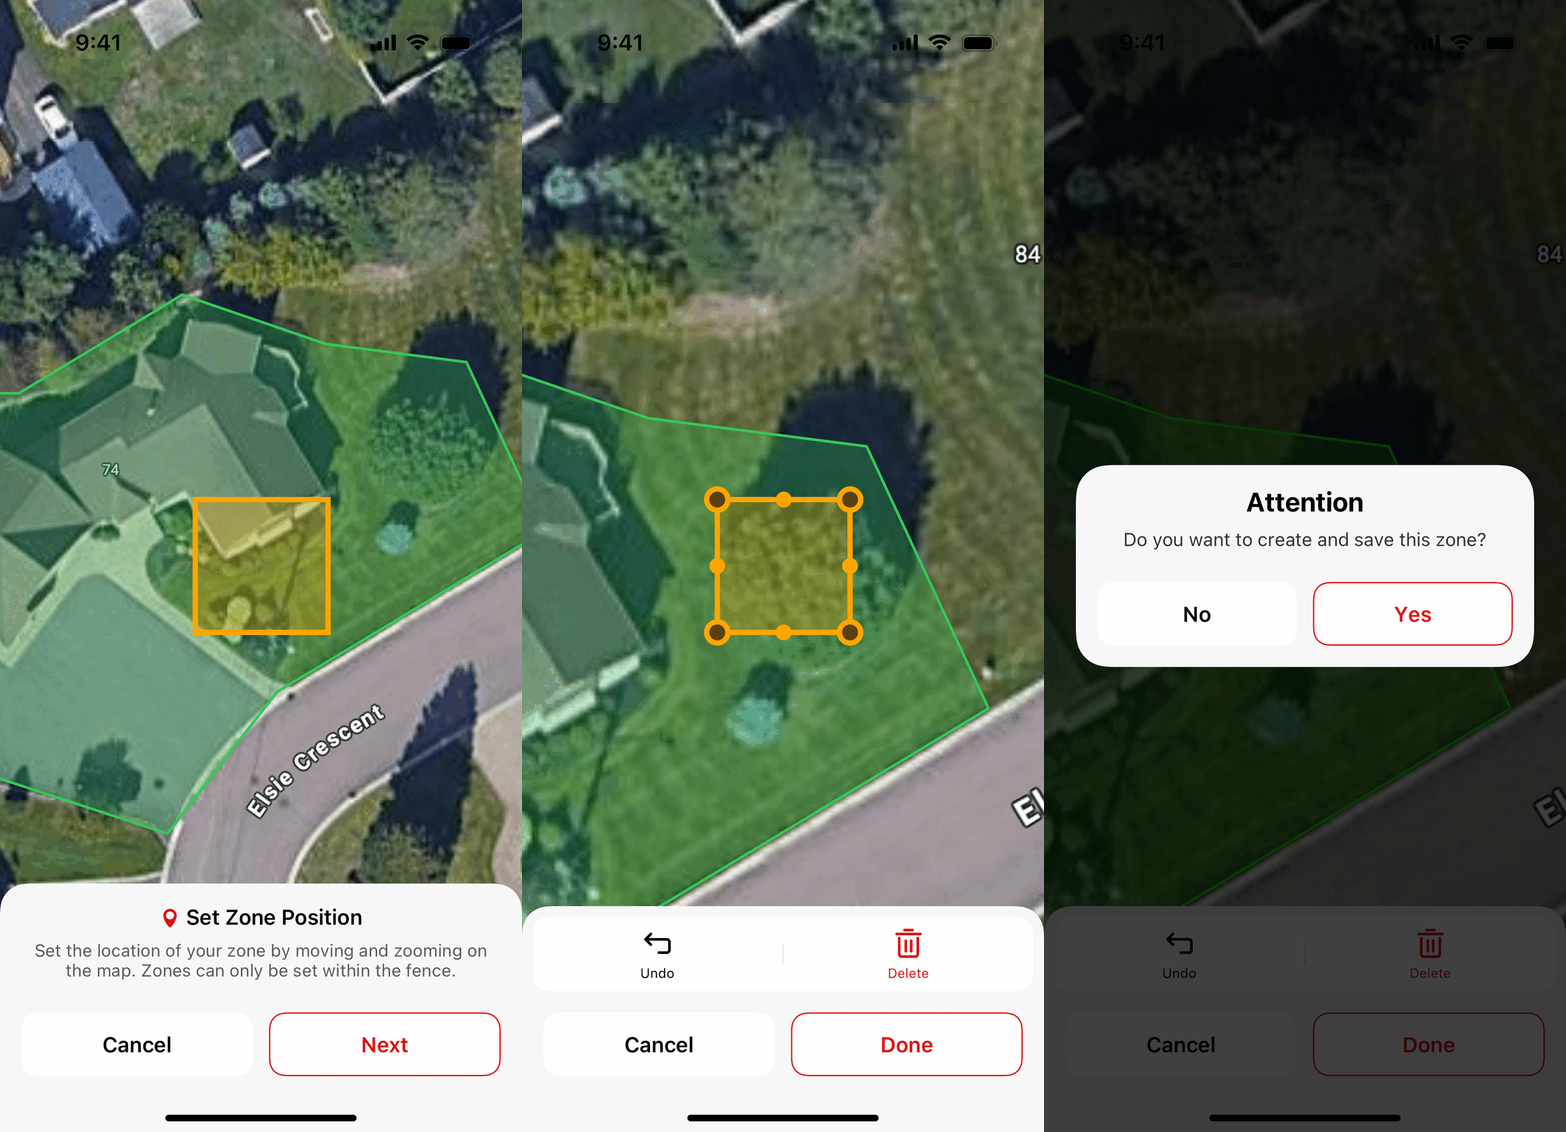
Creating a No-Go Zone:
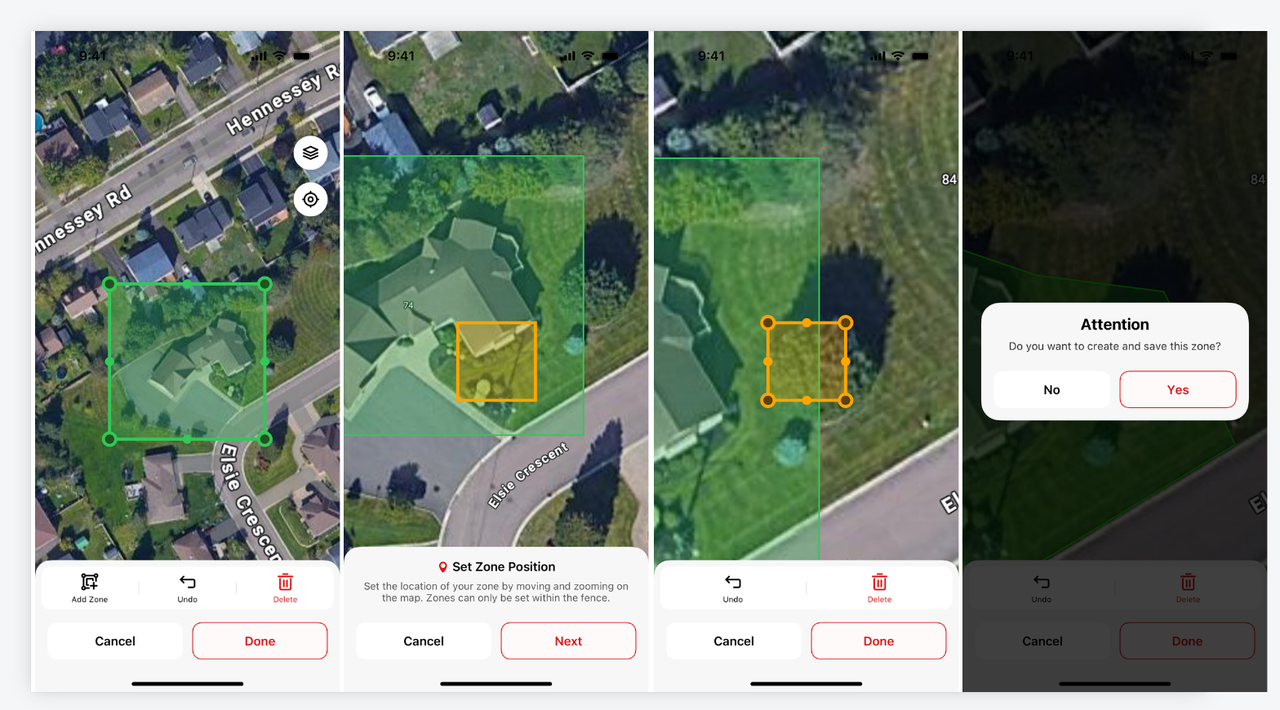
- Currently, you can only create one dangerous zone within a complex fence. This feature helps keep pets away from hazardous areas, such as swimming pools. Simple (circular) fences do not support the “no-go zone” feature.
- Set the location of the dangerous zone within the boundaries of the complex fence.
- Adjust the size and shape of the no-go zone as needed.
- Save your changes and return to the fence editing interface.
There are two states for a virtual fence: Activated/Deactivated and On/Off.
- Activated/Deactivated: Used when switching between different virtual fences.
- On/Off: Controls whether a selected fence is currently in effect.
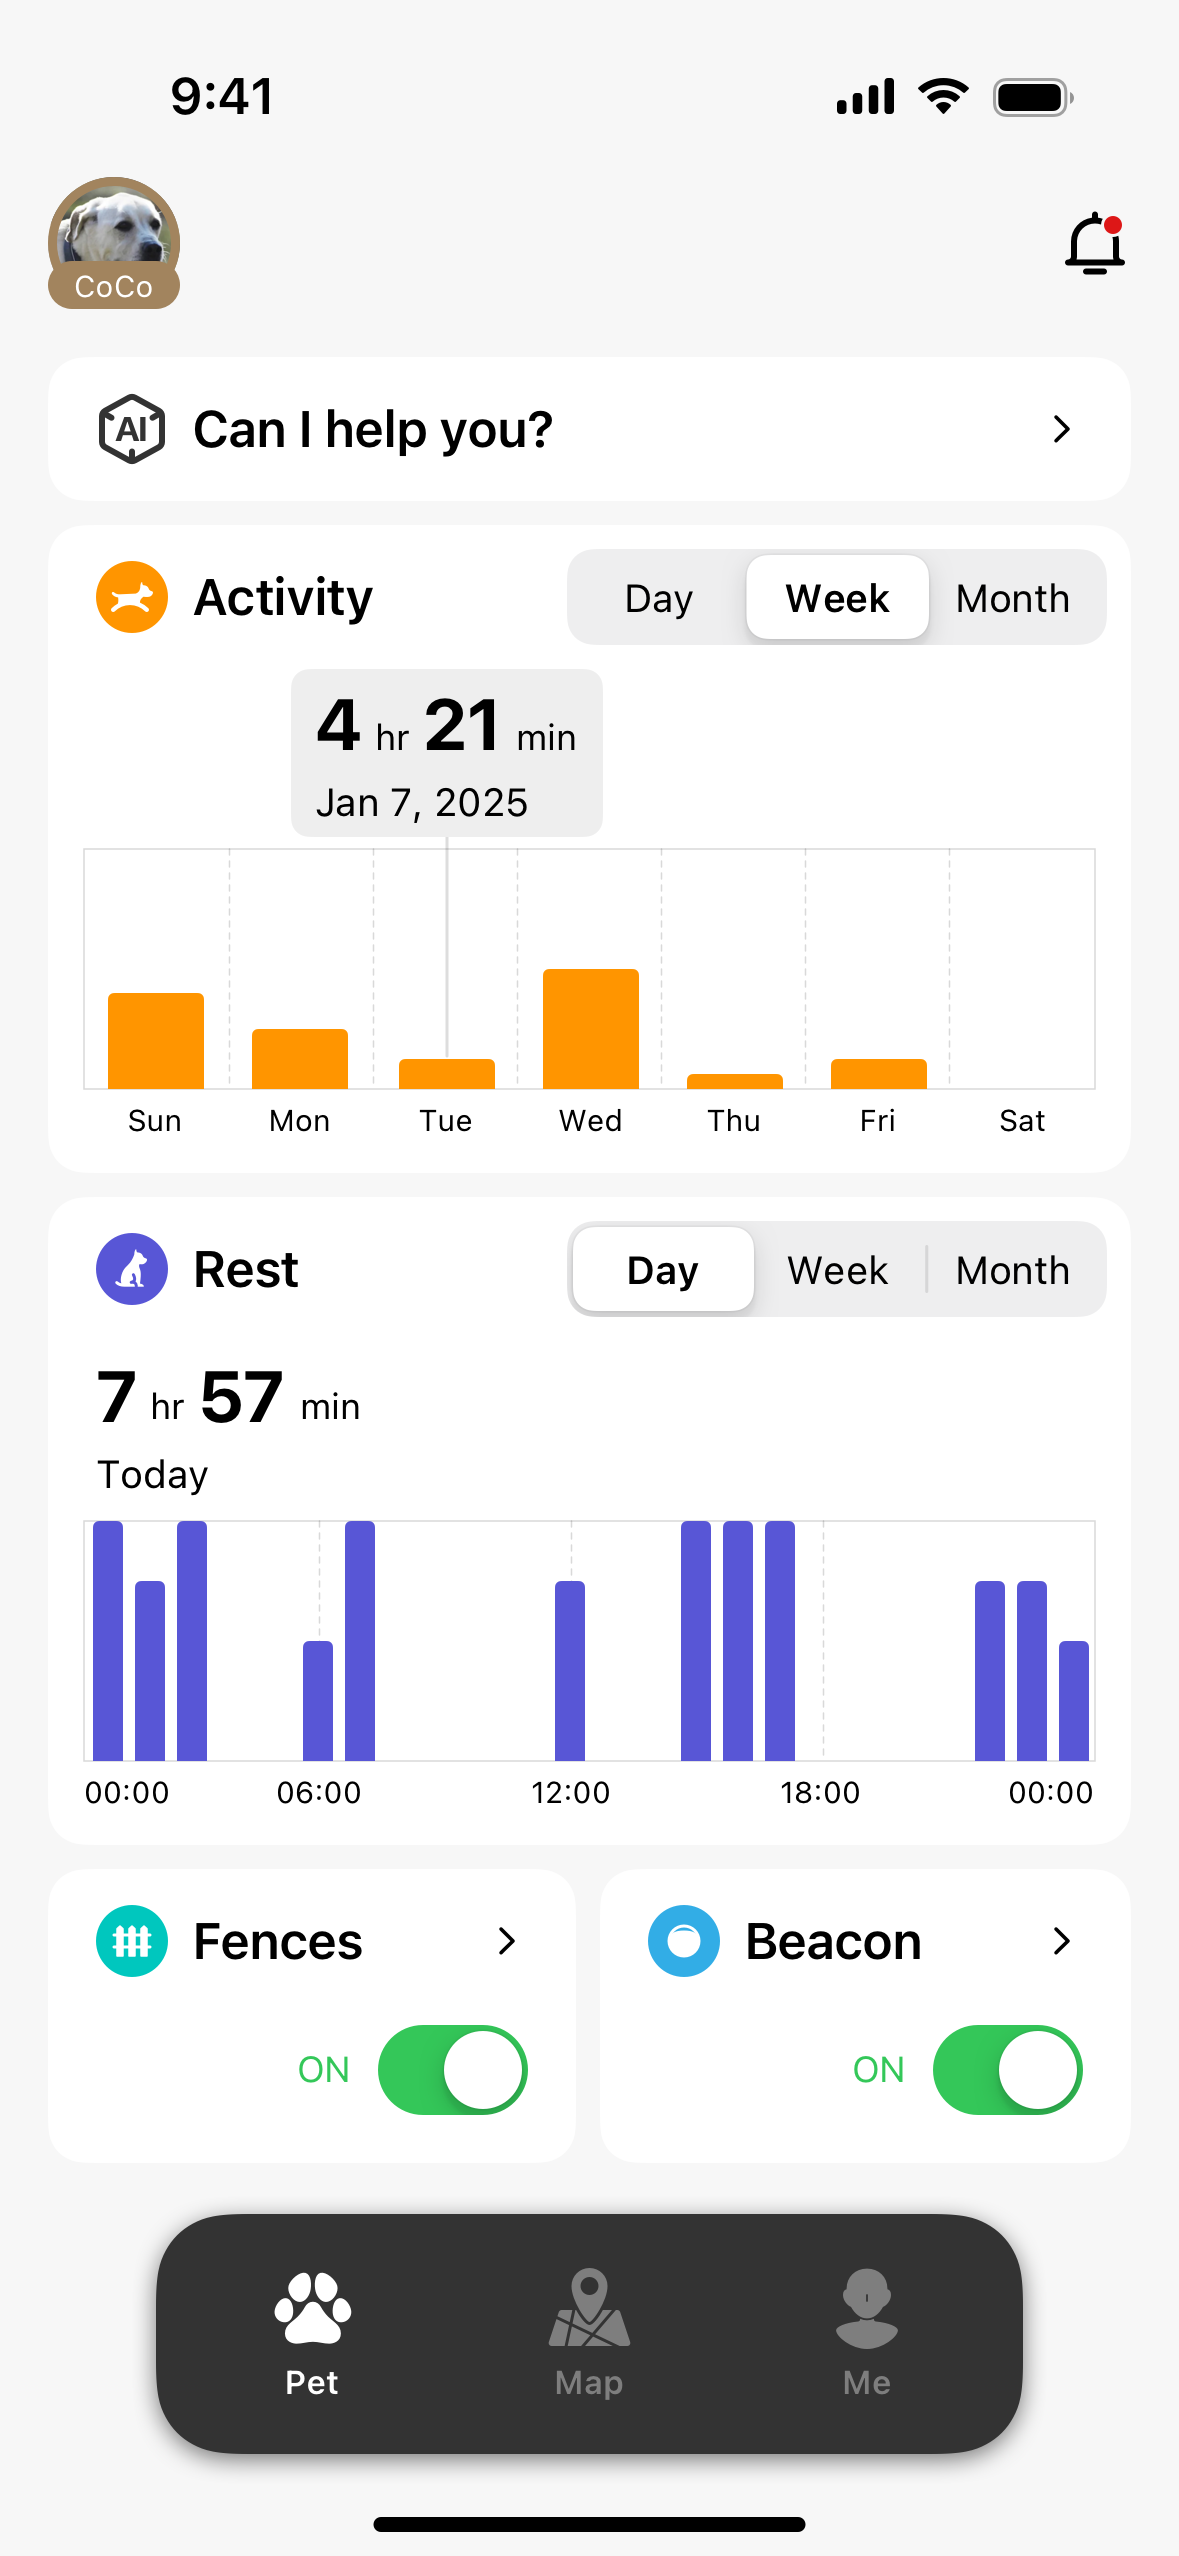
To manage fences:
- Go to the Fence page, select the desired fence from the list, and toggle the On/Off button to activate it.
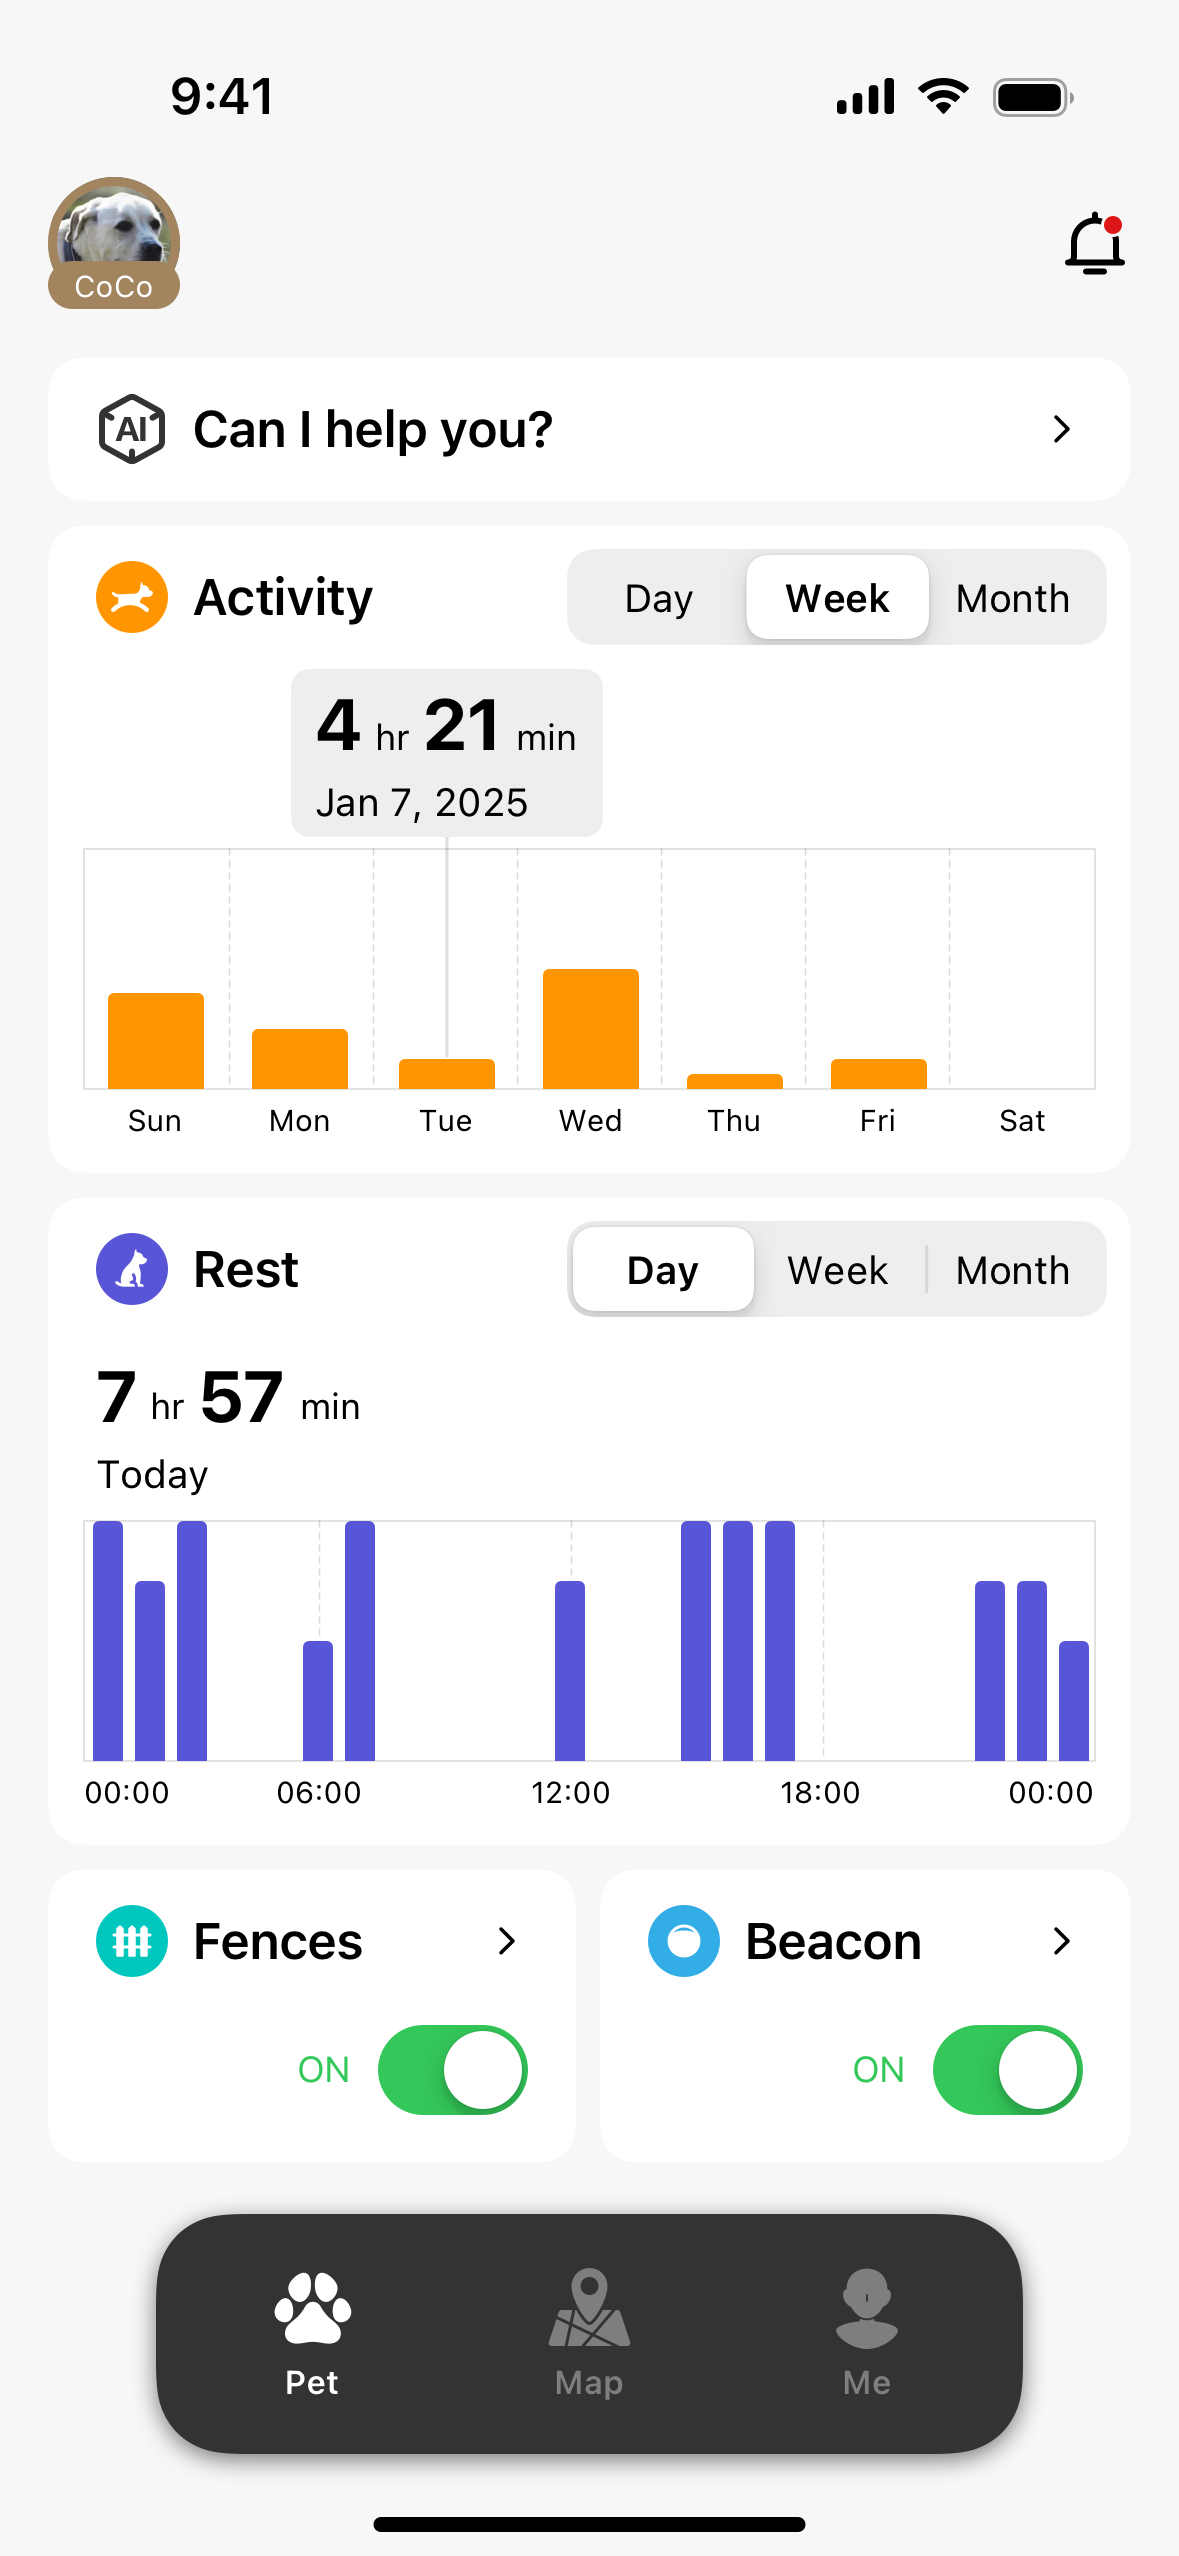
- On the Pet page, use the switch button in the lower right corner of the Fence card to turn the fence on or off.
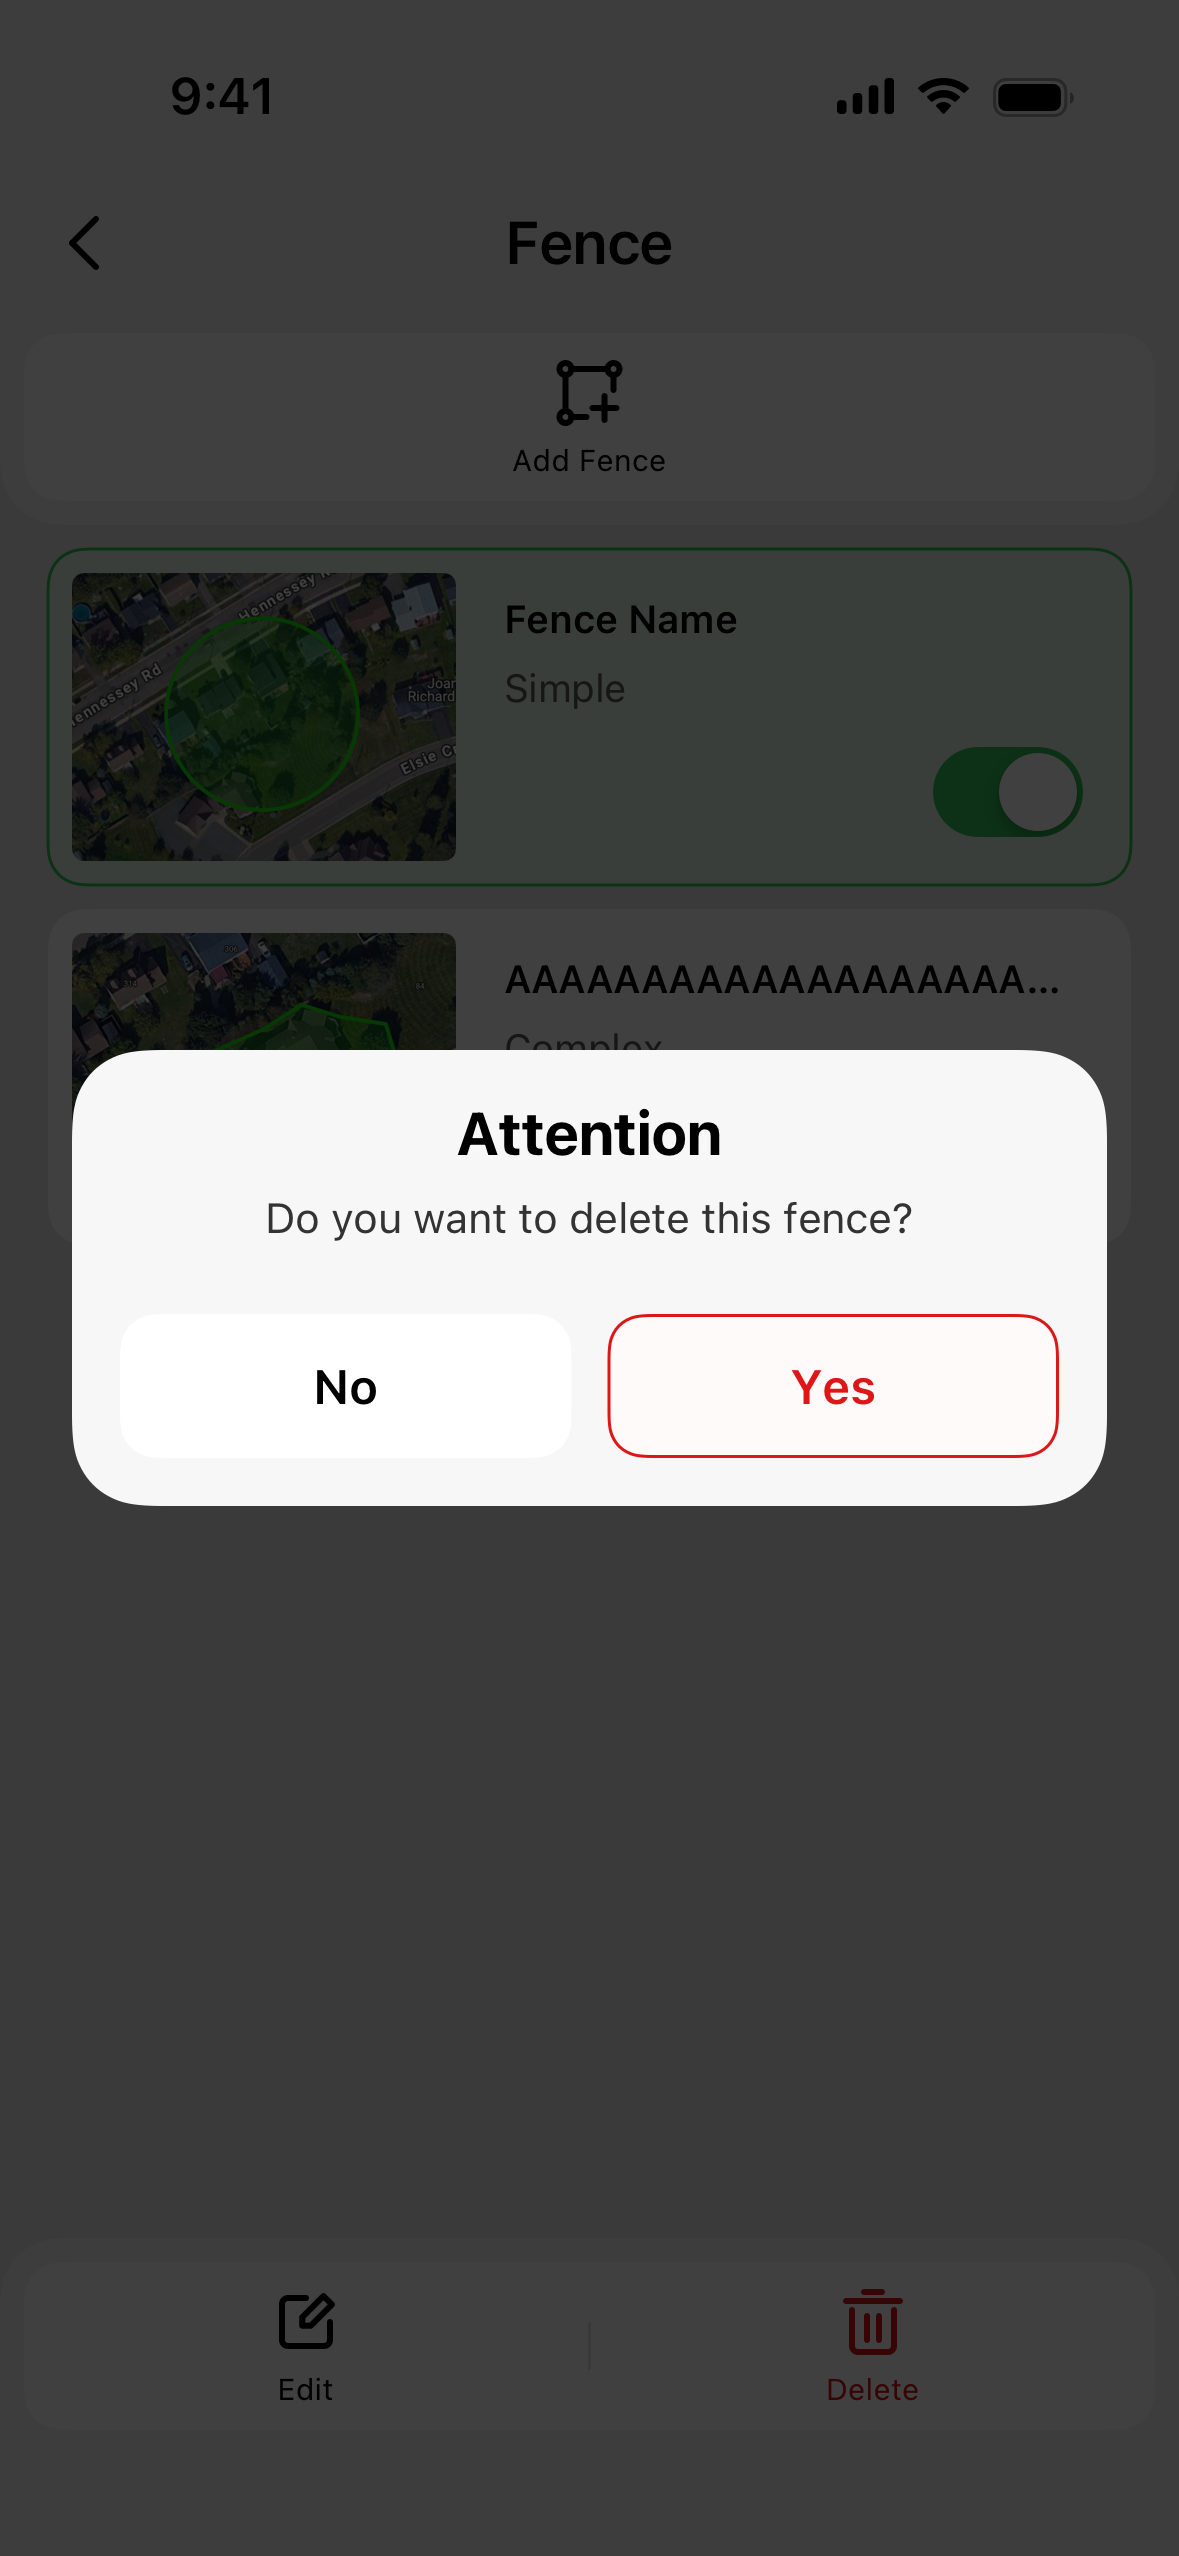
Go to the Fence page, select the fence you want to edit or delete, and click the "Edit" or "Delete" button as needed.
If you click "Edit", you will be redirected to the fence editing page, where you can modify the fence based on its type.
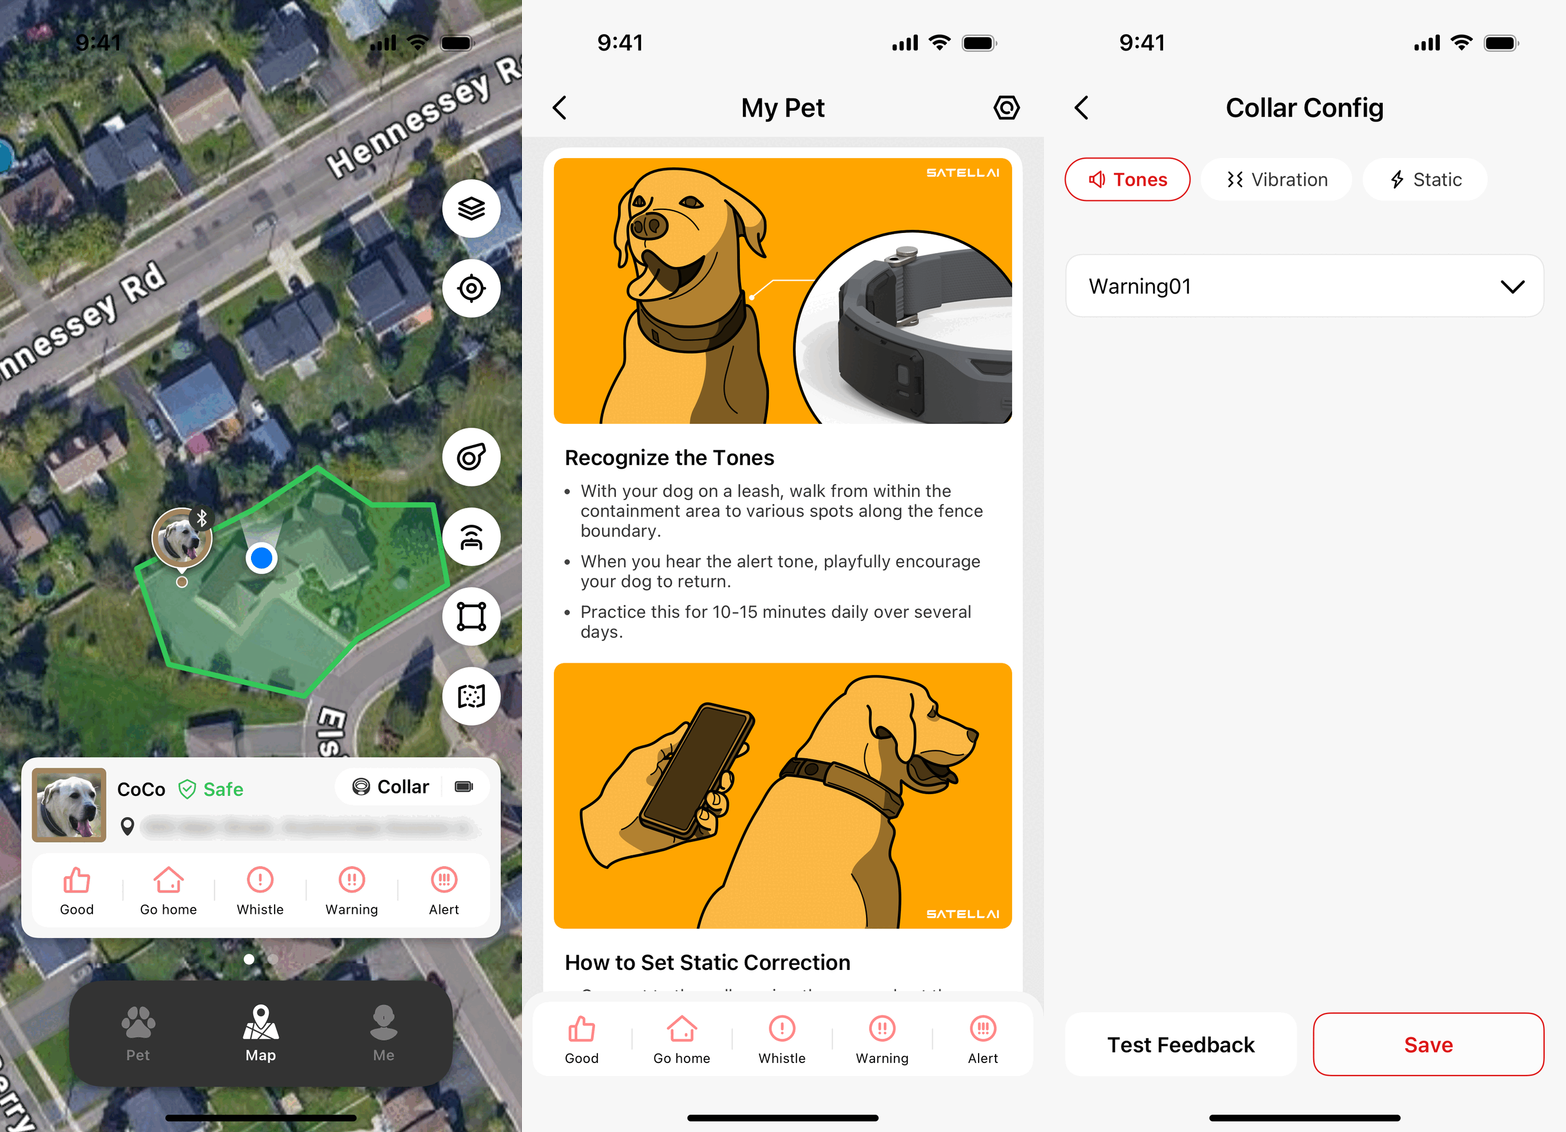
The PetVora Collar currently provides two types of sound effects: human voice sound effects and dog whistles.
Path 1: On the Pet page, find the pet card of the pet wearing the Collar. Tap the "Whistle" button in the middle on the right side to enter the basic training interface. Then, tap the settings button in the upper right corner to enter the advanced settings interface of the Collar. Tap the "Tones" tab at the top (this tab is the default).
Path 2: On the Pet page, find the pet card of the pet wearing the Collar. Tap the "Dog Trainer" button in the upper right corner to enter the dog trainer interface. Then, tap the settings button in the upper right corner to enter the advanced settings interface of the Collar. Tap the "Tones" tab at the top (this tab is the default).
- There are two types of human voice sound effects:
- Encouragement sound effect: "Good"
- Recall sound effect: "Go Home"
Note: Only the Collar supports this feedback, and all the above sound effects are pre-recorded. The human voice sound effects are only available in basic training and live mode.
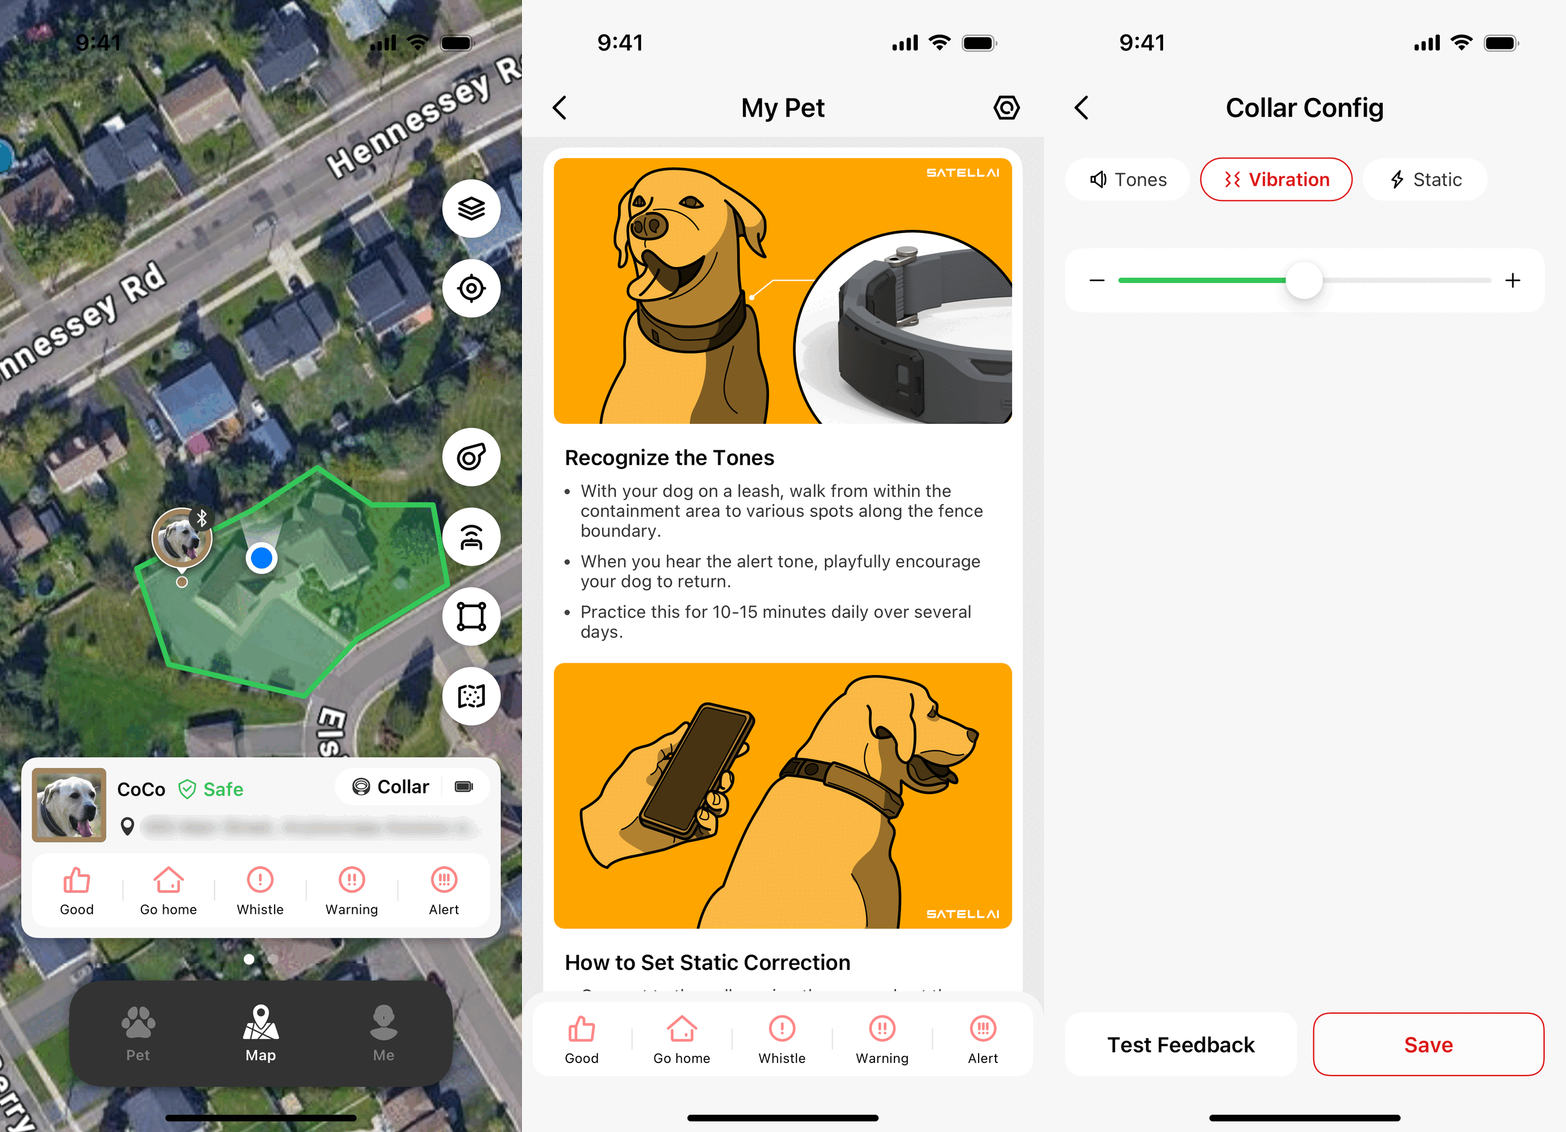
The PetVora Collar provides vibration feedback of different durations.
Path 1: On the Pet page, find the pet card of the pet wearing the Collar, click the "Whistle" button in the middle on the right side to enter the basic training interface. Then, click the settings button in the upper right corner to access the advanced settings interface of the Collar. Click the "Vibration" tab at the top.
Path 2: On the Pet page, find the pet card of the pet wearing the Collar, click the "Dog Trainer" button in the upper right corner to enter the dog trainer interface. Then, click the settings button in the upper right corner to access the advanced settings interface of the Collar. Click the "Vibration" tab at the top.
- Vibration intensity levels: 1-3 (low, medium, high).
Please refer to the folder "Training & Collar Config."
Note: Only the Collar supports this feedback. The above vibration modes are pre-programmed, and more modes will be added through future software updates or upgrades.
The PetVora Collar currently provides static correction feedback with different intensity levels.
Path 1: On the Pet page, find the pet card of the pet wearing the Collar, click the "Whistle" button in the middle on the right side to enter the basic training interface. Then, click the settings button in the upper right corner to access the advanced settings interface of the Collar. Click the "Static" tab at the top.
Path 2: On the Pet page, find the pet card of the pet wearing the Collar, click the "Dog Trainer" button in the upper right corner to enter the dog trainer interface. Then, click the settings button in the upper right corner to access the advanced settings interface of the Collar. Click the "Static" tab at the top.
- The static correction feature is turned off by default. You can click the switch to turn it on or off.
- Intensity adjustment: The minimum intensity level is 1, and the maximum is 3.
Note: Only the Collar supports this feedback, and it is turned off by default.
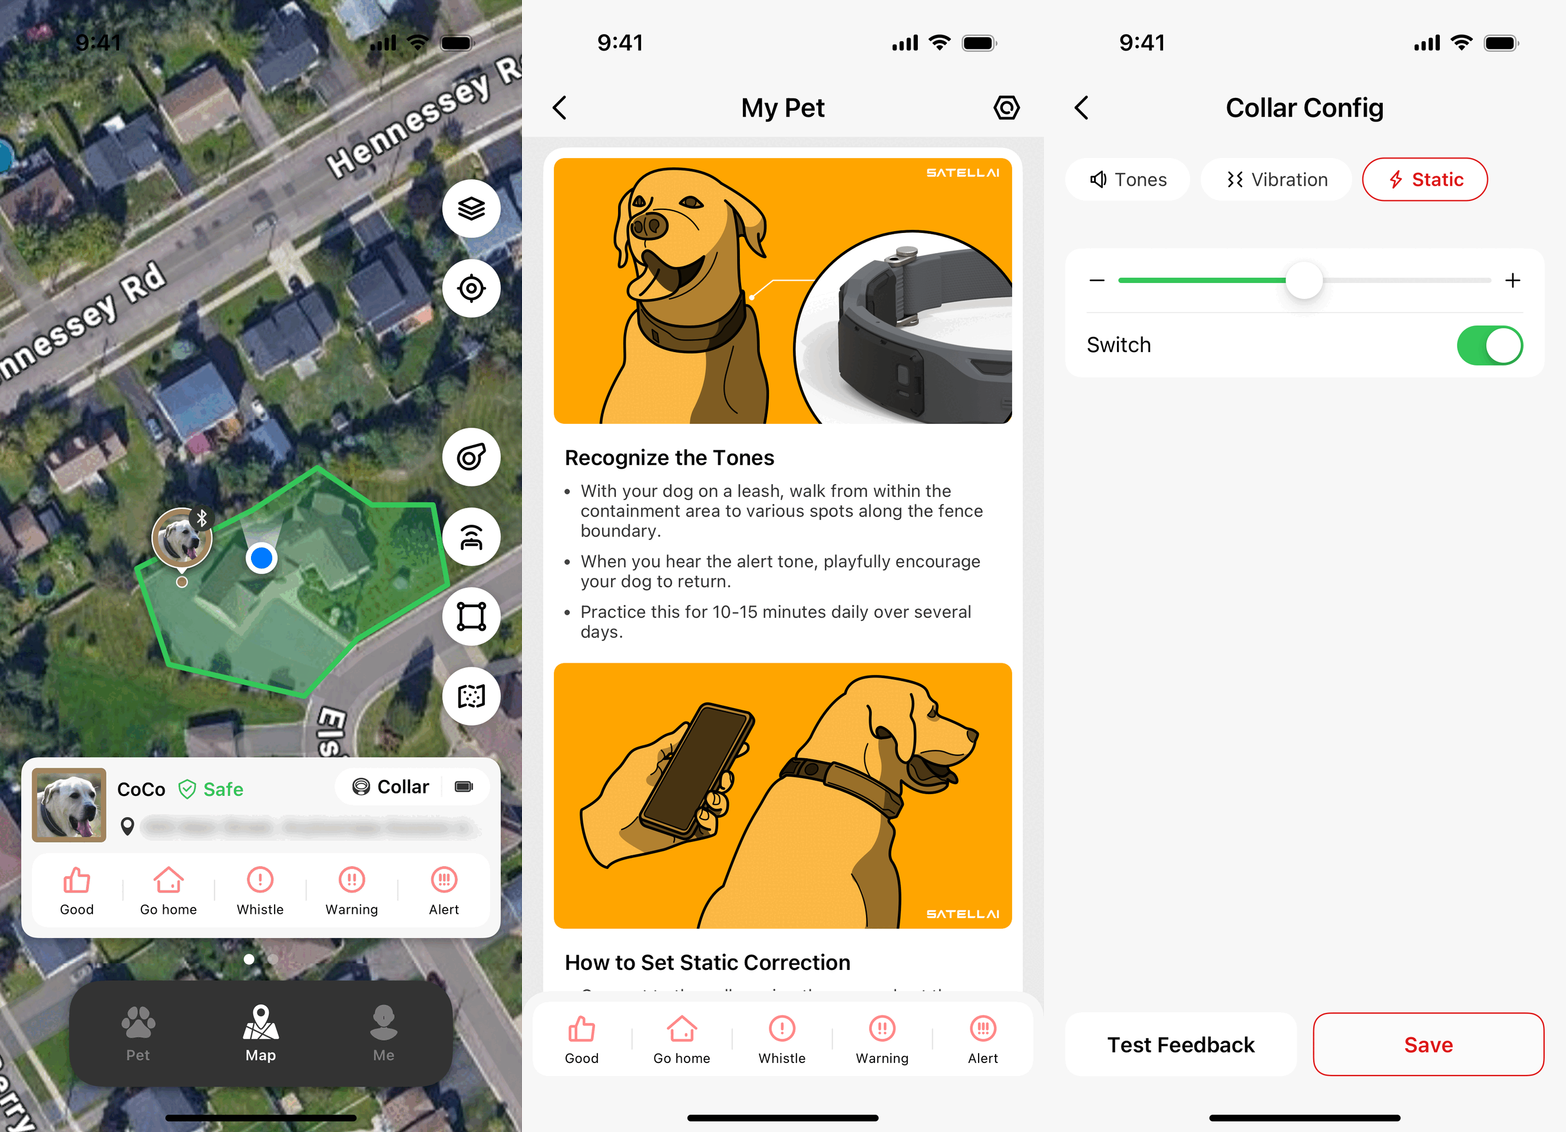
1. Recognize the tones
- With your dog on a leash, walk to various spots along the fence boundary from within the containment area.
- When you hear the alert tone, playfully encourage your dog to return.
- Practice for 10-15 minutes daily over several days.
2. How to set static correction
- Connect to the Collar using the app and set Static Correction to Level 5 out of 30.
- Practice near the boundary to help your dog recognize the tones.
- If needed, apply a static correction to guide your dog back.
- Reward your dog each time they return.
- Adjust the correction level as needed, and continue this training for 10 minutes per session over 2-3 days until your dog learns the boundary.
- If you prefer not to use Static Correction, use Vibration instead.
3. Proof-test the boundary with a distraction
- Introduce distractions to ensure your dog understands the boundary.
- For example, have another person stand outside the fence boundary as a distraction.
- Reward your dog if they respond to the alert tone and return to the safe area.
- Allow your dog to approach the boundary, and use the leash to guide them back if needed.
4. Observe and adjust as needed
- Once your dog is familiar with the boundary, you can let them off the leash and spend time together outside as they adjust to the GPS fence.
- When you and your dog are comfortable, enjoy time together off-leash!
- Monitor your dog off-leash near the boundary for a few days.
- If your dog escapes more than once a week, repeat the boundary recognition training.
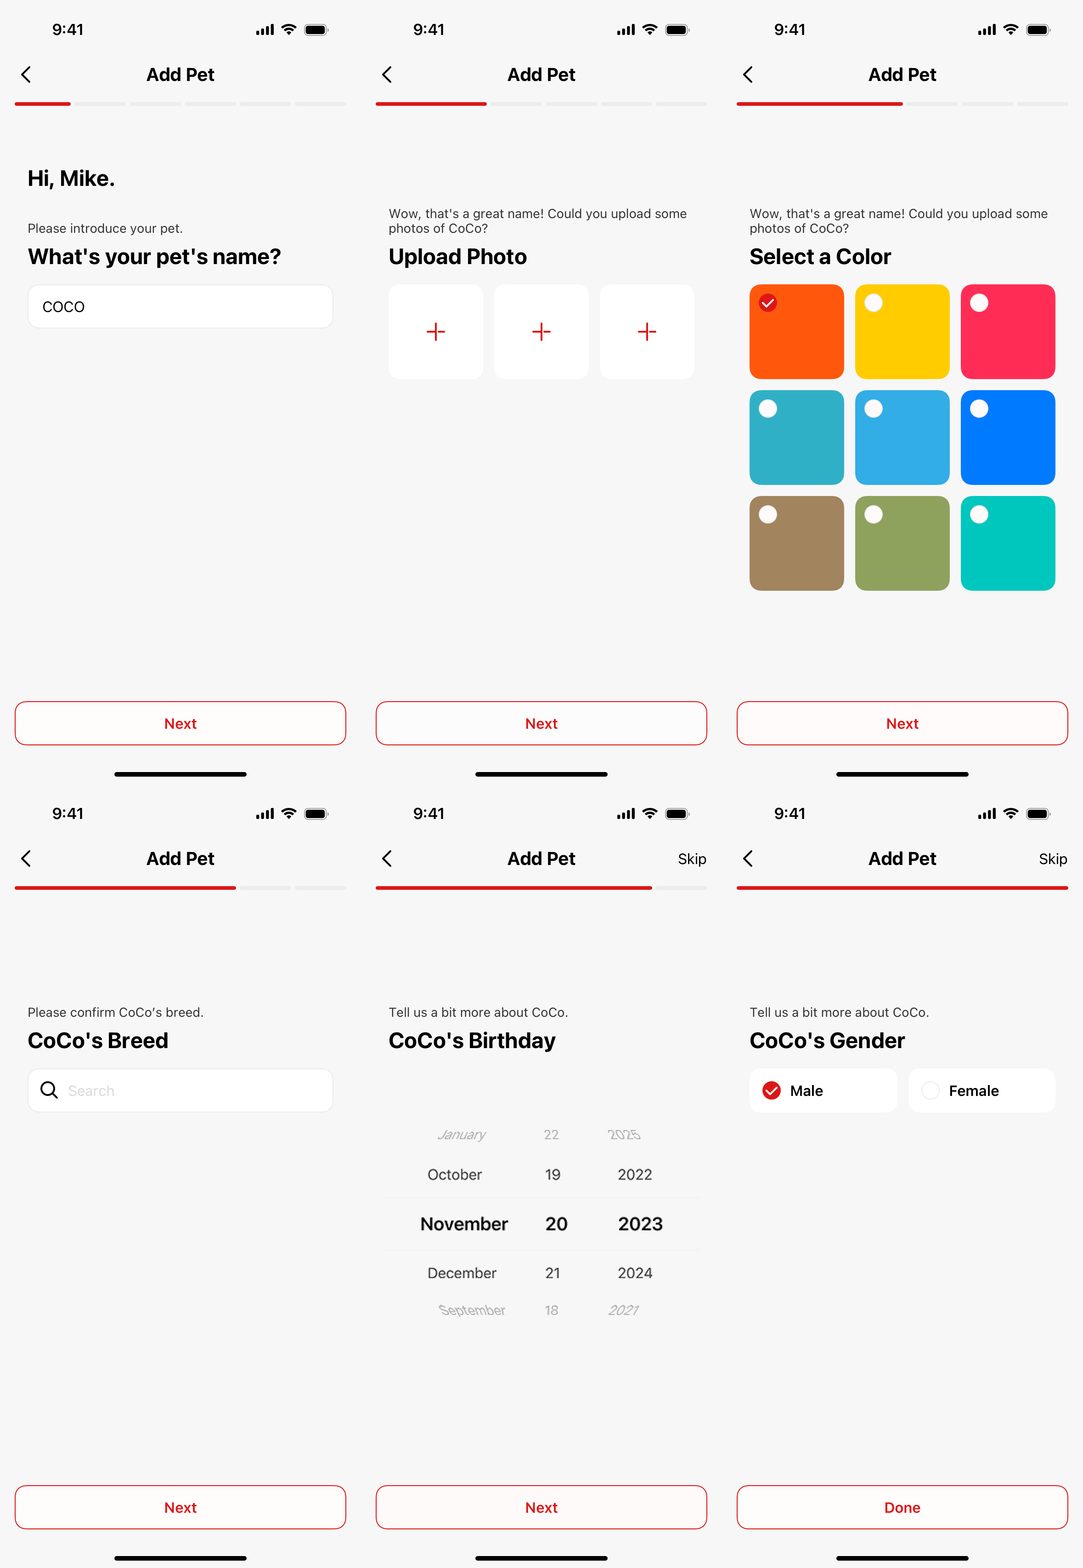
Path: App → “Me” → “My Pet” to enter the pet management page. Tap “Add Pet” at the top to add a new pet.
Note:
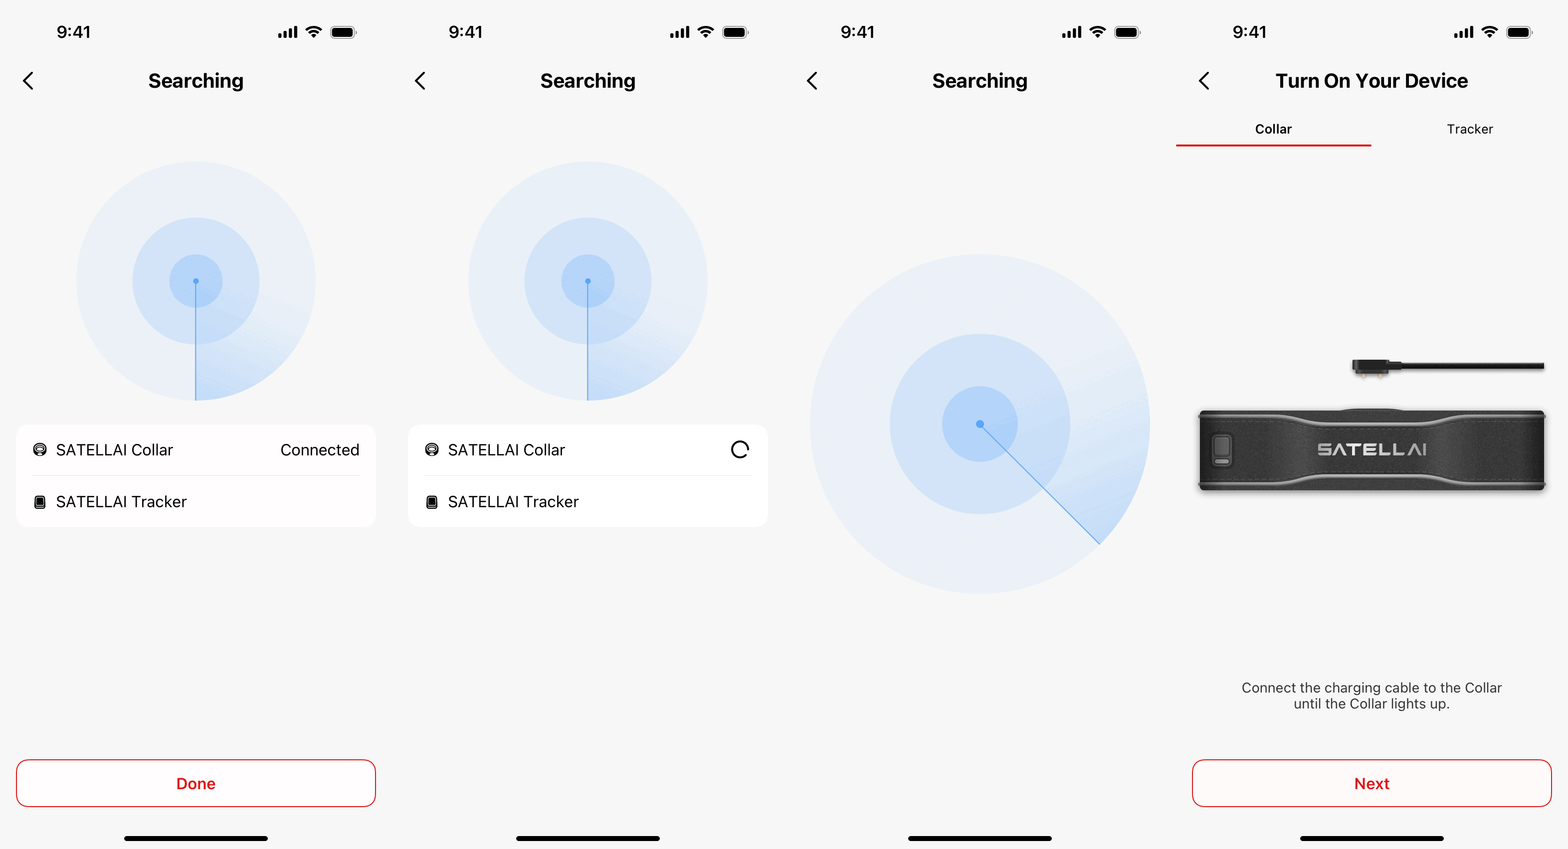
- Make sure your phone's Bluetooth is turned on and the Collar is nearby.
- After adding a pet, you’ll need to pair the Collar/Tracker with your app via Bluetooth.
- Each pet can only be paired with one Collar/Tracker at a time.
- If you have multiple Collars, please repeat the “Add Pet” and pairing steps for each one.
Collar-Before you buy
17 pitanja① Portable & Affordable - Take it anywhere without expensive installation.
② No Terrain Limits - Works in open fields, wooded areas, and uneven landscapes.
③ No Digging, No Wires - Set up virtual boundaries through the app without physical fencing.
A GPS collar helps keep your pet safe by tracking their location in real-time, setting virtual fences, and providing escape alerts. Whether for training, hiking, or everyday safety, it gives peace of mind.
The PetVora Collar is designed for most dog breeds and sizes. It works best in areas with clear GPS reception, such as open fields, parks, and suburban areas. It supports areas ranging from 0.5 acre to 100,000 acres for maximum flexibility, making it suitable for both small yards and large properties.
The collar uses advanced GPS technology for precise tracking. However, accuracy can vary based on terrain, weather, and nearby obstructions like tall buildings or dense forests.
① Dual Antennas & Dual-Frequency - Ensures superior accuracy compared to single-frequency collars.
② 5 Major Global Navigation PetVora Systems - Uses GPS, GLONASS, Galileo, BeiDou, and QZSS for maximum reliability.
③ Coverage in 180 Countries - Works worldwide, making it ideal for travelers and remote locations.
Yes, you can create unlimited virtual fences using the PetVora app. If your dog crosses a boundary, the collar will trigger an alert and use training cues (such as tones, vibrations, or static correction) to guide them back.
① GPS (Global Positioning System) determines the collar’s location using petvoras.
② Cellular connectivity is used to transmit that location data to your smartphone app. Without cellular coverage, the collar may still log location data but won’t update the app in real time.
Yes, cellular service is required for real-time tracking and alerts. The collar uses GPS for location tracking and cellular networks to send data to your mobile app. If there is no cellular coverage, live tracking may not be available, but offline location history can still be accessed later.
The PetVora Collar offers an exceptional battery life of up to 120 hours, compared to most brands that last only 25-30 hours. It also features magnetic fast charging, allowing it to fully charge in just 2 hours for maximum convenience.
Yes, the PETVORA collar is IP68 waterproof and dustproof, making it suitable for use in rain, snow, and even swimming.
The collar supports multiple training feedback options, including:
Tone alerts (encouragement and recall commands)
Vibration feedback (low, medium, high)
Static correction (adjustable levels, optional)
Yes, a Telecom Plan is required for real-time tracking, escape alerts, and location history. Pricing varies depending on the plan you choose.
The collar is designed for active dogs and built with high-quality, impact-resistant materials. It is suitable for rough terrain, outdoor adventures, and daily wear.
We offer multiple payment methods, including credit/debit cards, PayPal, and installment plans. We also support Afterpay, Klarna, and other financing options to make purchasing easier and more flexible.
We currently ship from our local warehouse in the U.S., ensuring fast delivery. Shipping within the U.S. typically takes 5-7 days.
No. Only one discount tier applies. The system will automatically choose the higher discount available.
- Collar only → $100 OFF every $499 spent.
- Collar + Accessories/Plan → $120 OFF every $529 spent.
- Collar + Accessories or Subscription Plan: Save $120 on every $529 purchase - up to $960 total savings!
- Collar Only: Save $100 on each Collar (originally $499.99, discount applies to every item you buy). Note: Discounts do not stack.
Collar-Telecom Plan
10 pitanjaYes, all telecom plans are set to auto-renew. Your telecom plan will automatically renew at the end of each billing cycle unless you cancel before the renewal date.
You can cancel your telecom plan at any time. Just make sure to cancel before the next renewal date to avoid being charged for the upcoming period.
Note: Even if you cancel your subscription, your current telecom plan period will remain active until it expires.
Canceling is easy:
1. Log into your account.
2. Go to "Account Details" > "Manage Subscription".
3. Navigate to the subscription you want to cancel.
4. Select 'Cancel Subscription' and confirm.
You will receive a confirmation email once your telecom plan is canceled.
Note: Even if you cancel your subscription, your current telecom plan period will remain active until it expires.
Important:
It is the customer's responsibility to cancel the subscription before the next billing cycle. We cannot take responsibility for charges resulting from failure to cancel or from third-party bank fees.
If you don't cancel before the renewal date, your payment method on file will be automatically charged for the next telecom plan period. Please keep an eye on our renewal reminder emails.
If you did not use the telecom plan after it renewed, please contact our customer support team as soon as possible. We will review your case and assist with refund requests.
Please note: We cannot refund any additional fees charged by banks or payment providers, such as overdraft fees or chargeback fees.
Yes, we send a reminder email 3 days before your subscription renewal, including details on how to cancel if you wish.
If your payment fails, our system will try to process it again and will notify you by email to update your payment information.
Yes, you do. The refund only applies to the existing order. Canceling the subscription is necessary to prevent any future orders and charges.
The Telecom plan does not require activation. However, please make sure to register your email on the official website and complete your purchase. Then log into the app using the same email address. Otherwise, the service may not work properly.
A Telecom Plan(subscription) is typically required for cellular connectivity and app-based services, such as:
-Real-time location updates
-Fence breach alerts to your phone
-Location history and cloud features
Without an active subscription, features that rely on LTE/app syncing may be limited.
How the Collar Works
10 pitanjaA dog GPS fence collar is a smart wearable device that helps keep your dog within a safe area without the need for a physical fence, like PetVora. It connects to an app so you can track your dog’s location in real time. PetVora uses GPS technology to create virtual boundaries, known as geofences. After a training period, your dog can learn to recognize these boundaries. When your dog approaches or crosses them, the collar sends warning signals, such as tone, vibration, or gentle static correction to guide them back inside the safe zone. PetVora provides a flexible, humane way to keep your dog safe off-leash, giving both you and your pet more freedom and peace of mind.
Yes, it is safe for your dog to wear a smart collar when used properly. The PetVora Collar is designed with your pet’s comfort and safety in mind. It is typically lightweight, adjustable, and the strap is made of food-grade silicone material.
Yes. The cellular signal is required to use the PetVora Collar. Please make sure there is a stable 4G signal in your area for proper functionality.
It may take about 10 mins to set up the PetVora Collar.
- Measure your dog's neck with a tape measure or by using a string along with a ruler. Please make sure to leave room for 2 fingers to fit between your dog's neck and the collar.
- Download the PetVora app and register or login to your account.
- Add your pet's info, including three photos, breed, birthday, and gender.
- Add your PetVora Collar to the app. (Make sure your collar is fully charged first.)
You can set up the GPS fences for your dog via the PetVora app on your phone.
- Press the "Fence" tab on the "Pet" page in the PetVora App.
- Choose "Add Fence".
- Choose the fence set-up method you prefer: simple fence or complex fence.
Simple Fence:
A simple fence lets you create an adjustable circular boundary, initially centered around your mobile device, which can be repositioned and resized. You can easily set the fence location by moving and zooming on the map or by searching for an address. After establishing the size and position of your fence, just press the "Done" button and then enter a name for it in the pop-up box. Once you press the "Save" button, your new fence is locked in. From here, you can find it on the list of fences and you'll be able to turn it on.
Complex Fence:
You can set your fence by moving and zooming the map. Once it's in position, tap “Done” to adjust the fence shape by dragging existing posts. To save it, tap “Done” again, enter a name for the fence, and press “Save.”
Select the "Add Zone" option to create a new, initially square-shaped area within the original fence. This no-go zone helps prevent your dog from approaching areas you'd like them to avoid.
There are three alert types: tone, vibration, and static correction.You can customize the alert types on your PETVORA collar through the app by following these steps:
- On the "Me" page, tap "collar settings". You can set the correction functions for the fence, the beacon, and remote feedback (which is listed in the app under "Others").
- You can adjust the tone volume, vibration intensity, or enable static correction in the following three situations to alert your pet.
The static correction is a mild, harmless electric stimulation delivered by a collar to attract your dog's immediate attention. It doesn't hurt your dog and it is optional. If you want to use static correction, you need to install the two sets of static contact points in the box.
When your dog gets within 16 to 17 feet (5 meters) of the boundary, the PetVora Collar will deliver a correction and you'll receive a notification.
If your dog goes outside of the fence and stays within 110 yards of it (100 meters), it will receive continuous correction after going through the boundary and you'll receive a single notification.
The PetVora Collar uses GNSS (GPS) petvoras for positioning and LTE-M cellular connectivity for data syncing and real-time updates to your app (location updates, alerts, history, etc.).
If your area has weak LTE coverage, the collar may still get GPS position, but app updates and alerts can be delayed or less reliable. For best results, we recommend using it in areas with stable LTE coverage.
Note: The PetVora Collar is designed primarily for outdoor use with LTE connectivity. Wi-Fi is not a direct replacement for LTE for real-time outdoor tracking and alerts. If LTE is very weak in your area, the overall experience may be limited.
Battery life depends on usage (tracking frequency), GPS/GNSS conditions (trees/buildings), and network strength, Weak LTE or heavy obstruction may increase power consumption.
PetVora Collar: Up to 120 hours (5 days) on a single charge, and it can fully charge in about 2 hours (fast charging).
Important (Power-Saving Mode):
If Power-Saving mode is NOT enabled, typical battery life is expected to be around 2-3 days (depending on signal quality, tracking frequency, and whether the collar is triggering frequent fence events/alerts)
Account & Subscription
4 pitanjaYou can create a PETVORA account from the PetVora Smart Collar Air app or through our official website.
Steps:
1.Visit https://petvora.com/account/login.
2.Click “Sign Up.”
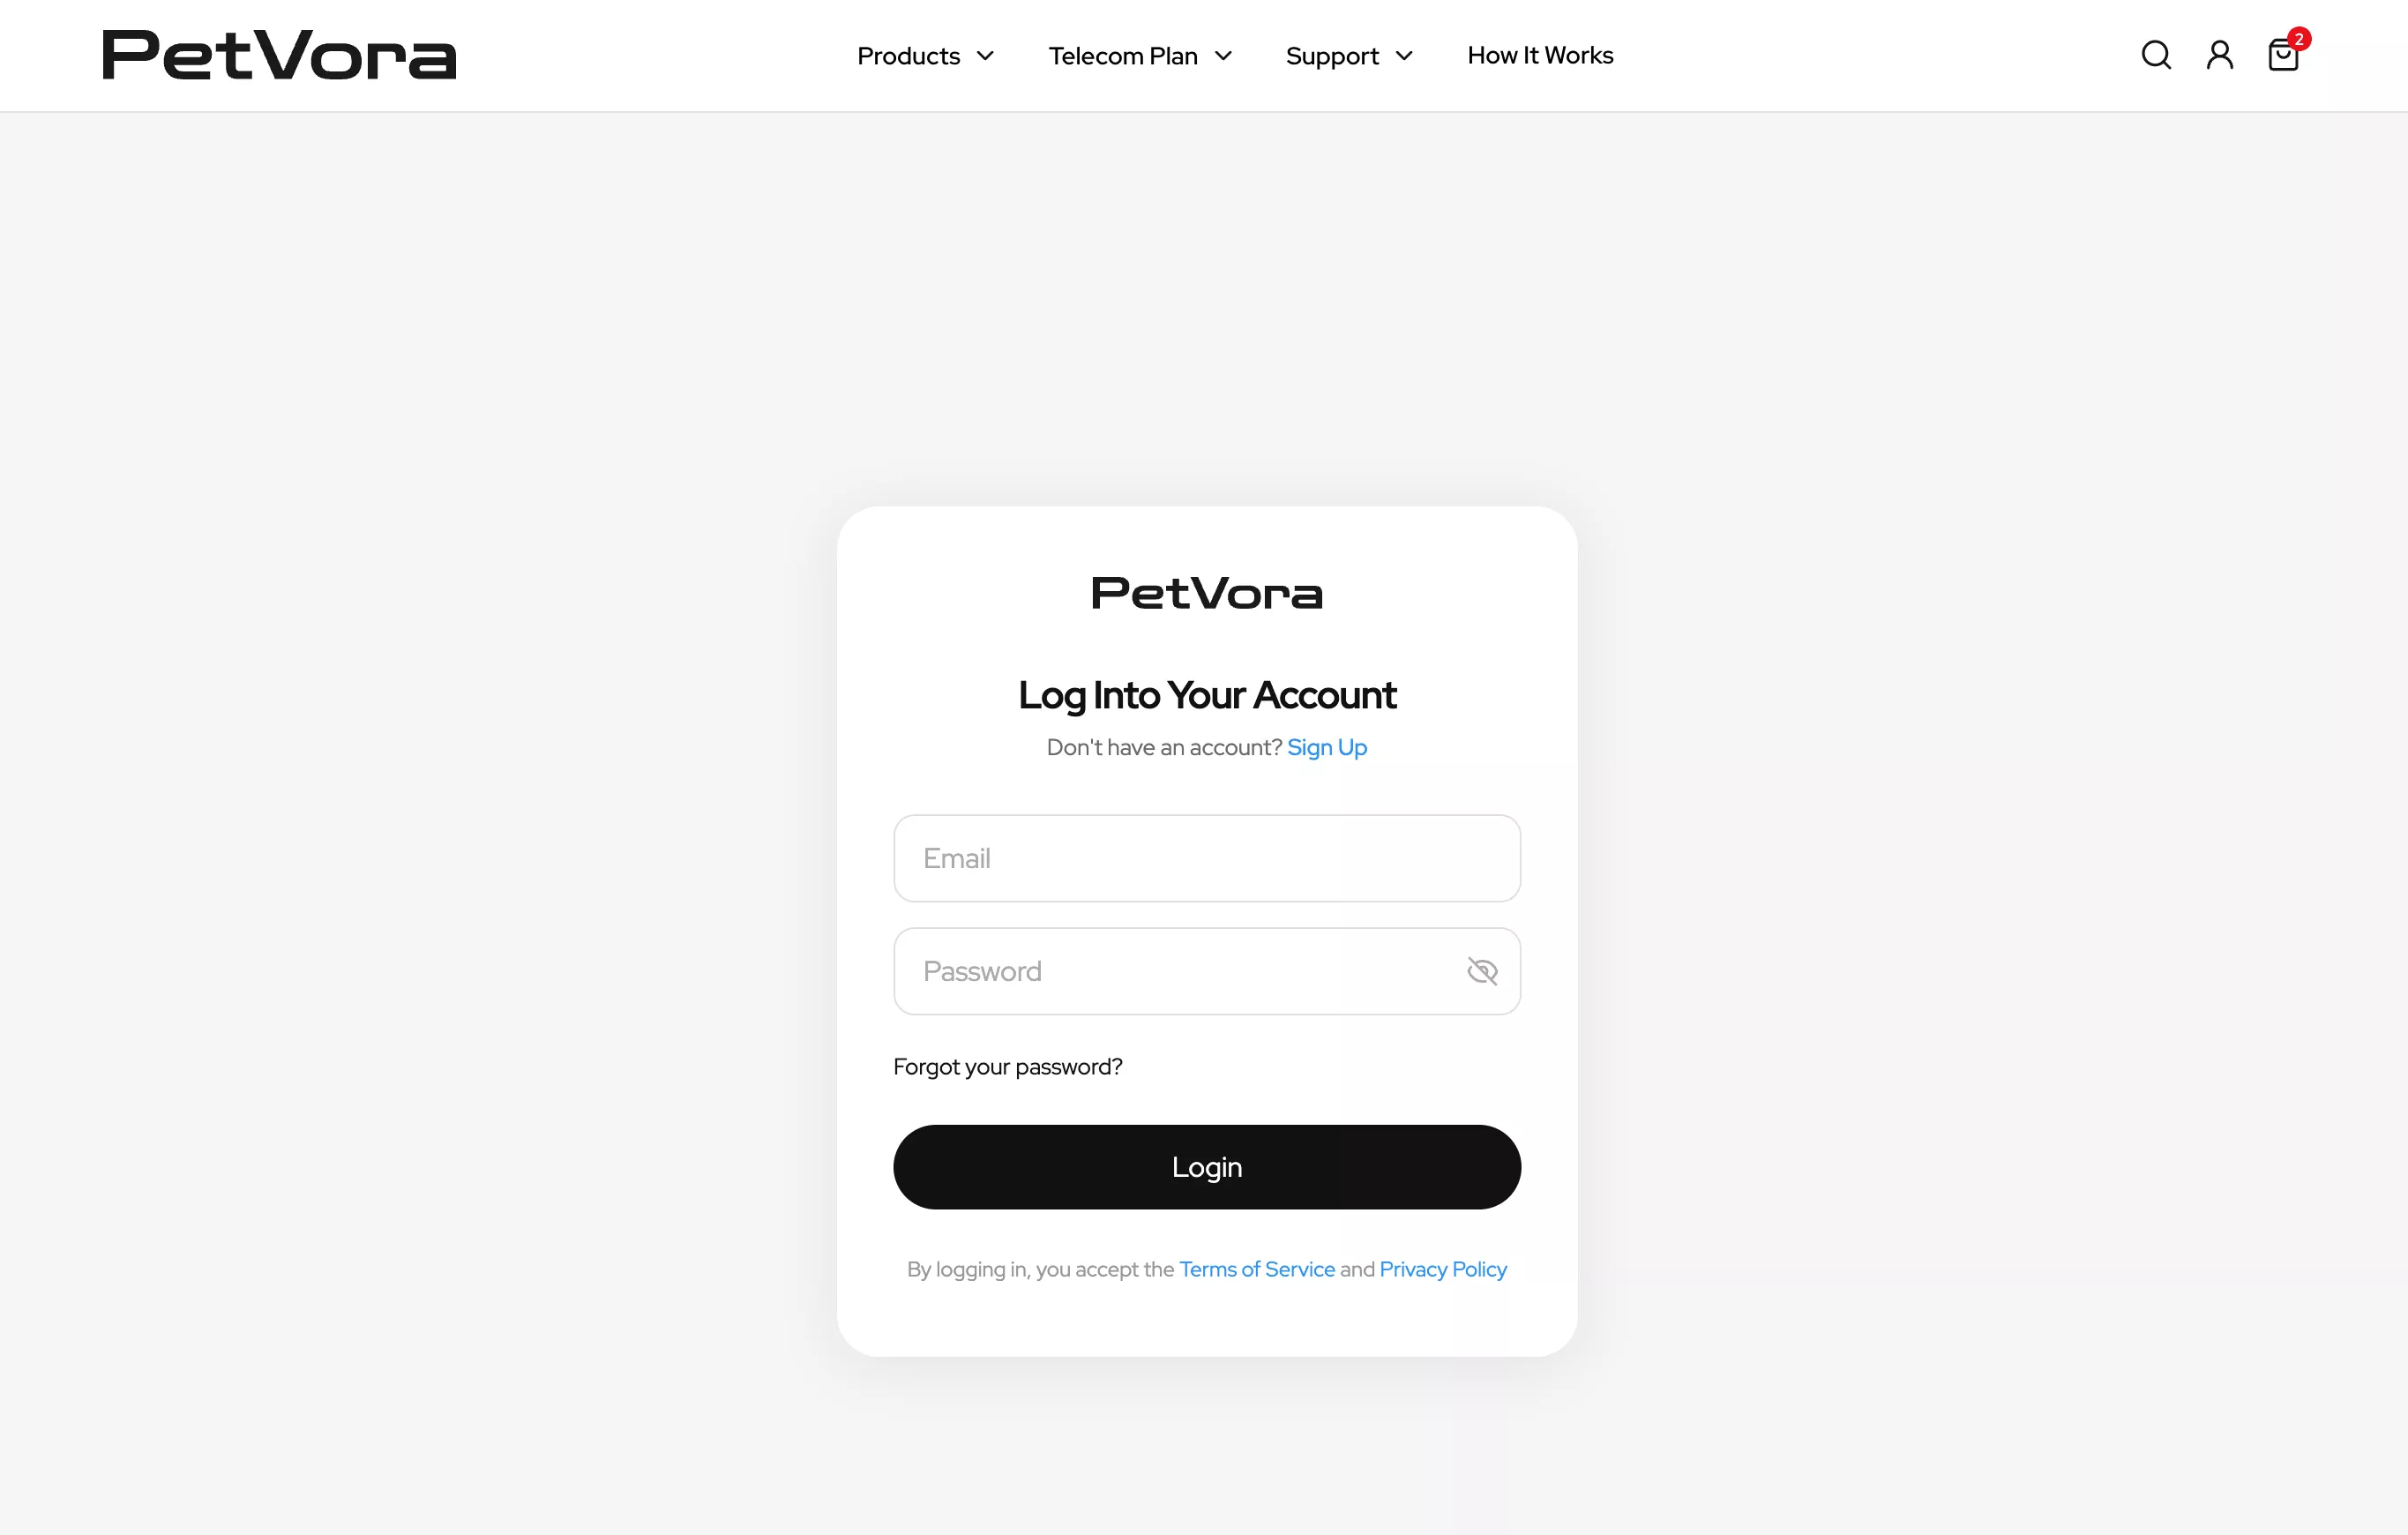
3.Follow the on-screen instructions to complete registration.
You can view or update your telecom plan anytime from your PetVora account dashboard.
Steps:
1.Log in to your account at https://petvora.com/.
2.Scroll down to “My Telecom Plans.”
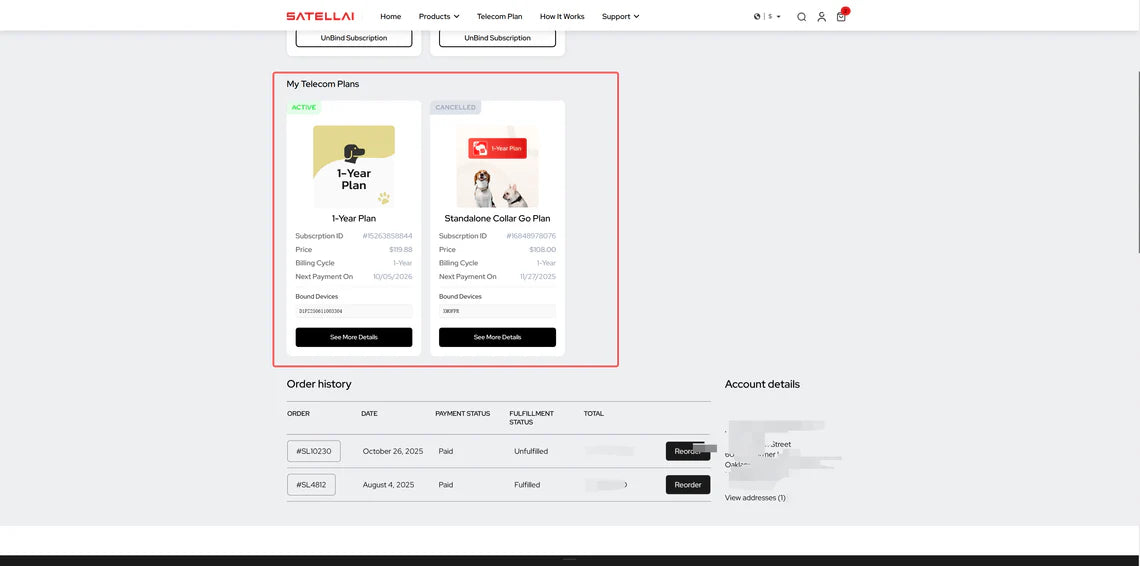
3.Manage renewal, billing, or other details.
You can pause your telecom plan by following the steps below:
Step:
1.Log in to your account at petvora.com.
2.Go to “My Telecom Plans.”
3.Click "See More Details"
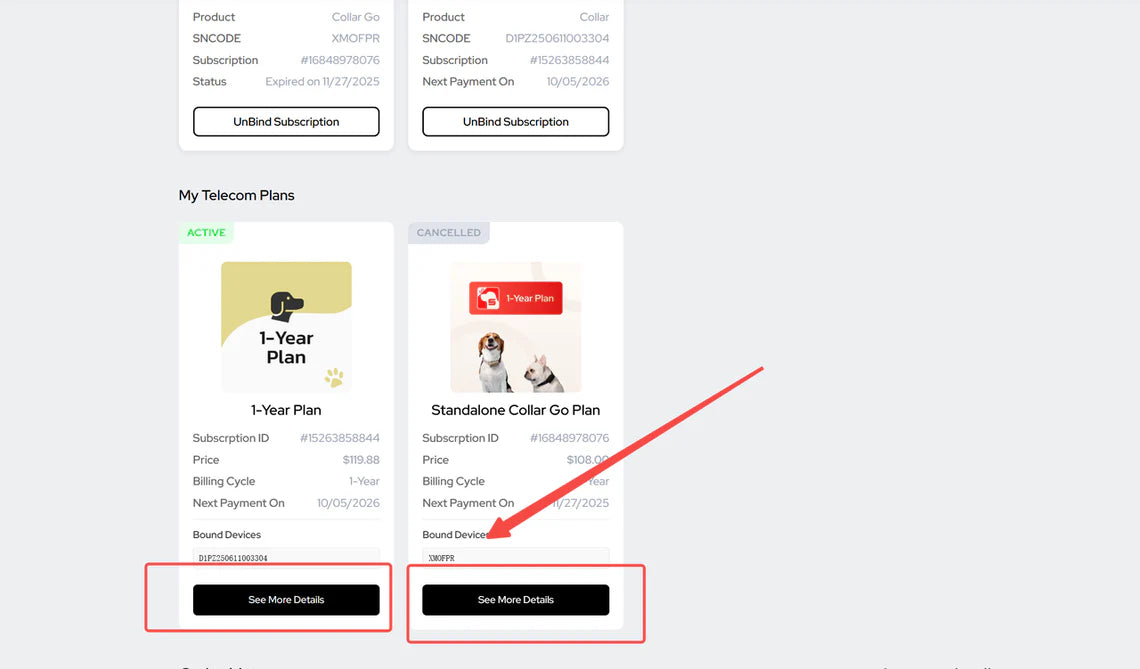
4.Click "Pause Telecom Plan".
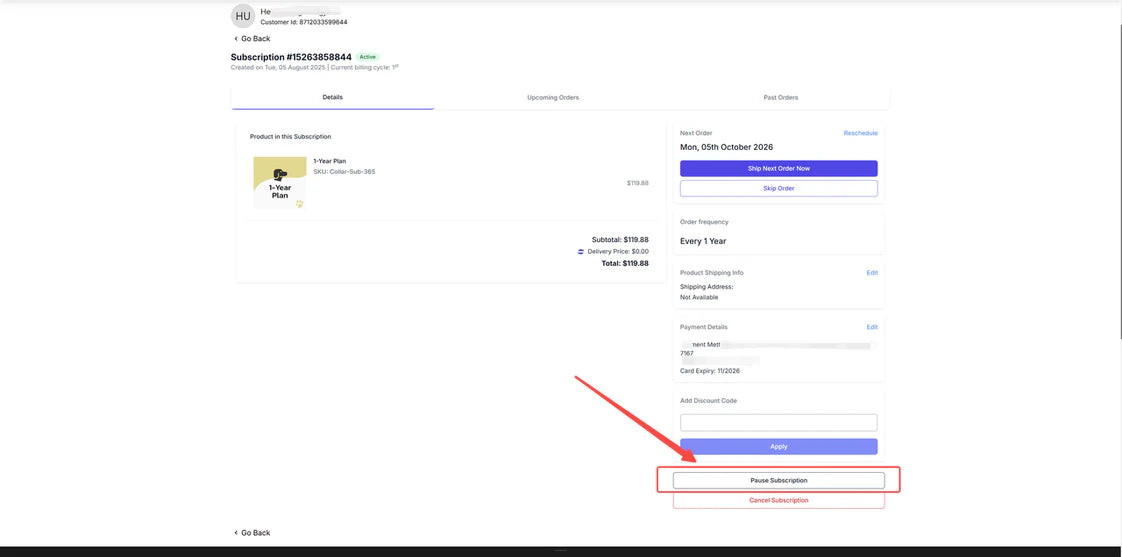
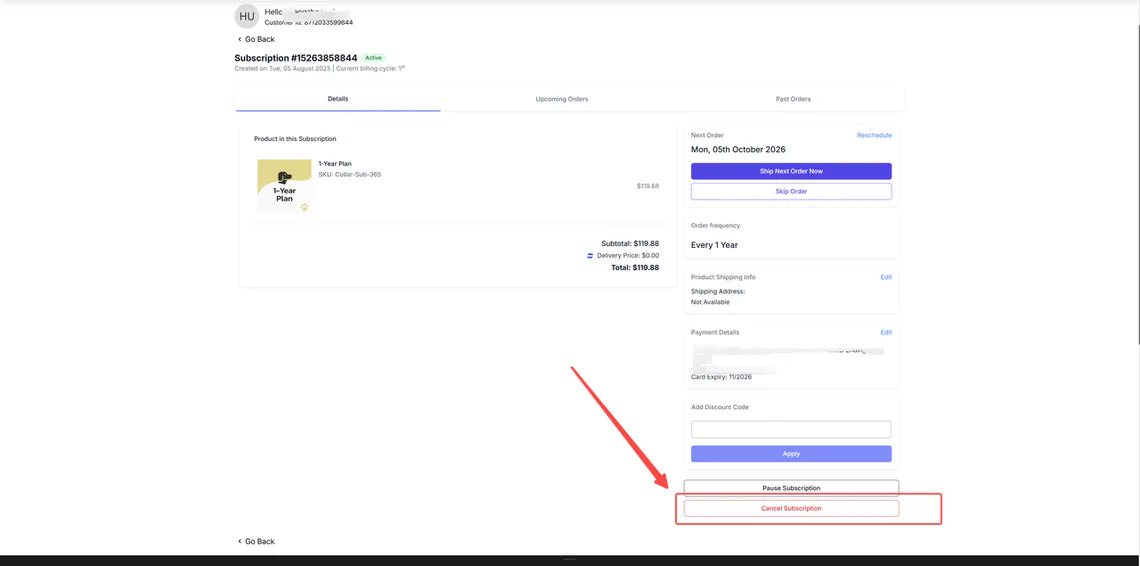
You can cancel your telecom plan directly in your account by following the steps below:
Step:
1.Log in to your account at petvora.com.
2.Go to “My Telecom Plans.”
3.Click "See More Details"
4.Click "Cancel Telecom Plans".
Collar Air-Orders & Shipping
6 pitanjaTo check your order information, please refer to the following steps:
1.Log in to your account at petvora.com.
2.Scroll down and find “Order history.”
3.Click the order and you'll be able to see your order information. Includes:
- Order Number
- Order Date
- Order Status
- Payment Status
- Total Amount
Currently, we ship to the following countries/areas: UK、EU
More details: Shipping Policy
No. PetVora Collar Air ships from local warehouses in the US, EU, and UK, so you don’t need to pay any customs duties or import taxes.
For shipments outside the EU, local taxes or import duties may apply according to the destination country's regulations.
If you have already placed your order, please contact our customer support team to update your shipping information.
If you haven’t placed your order yet, you can modify your shipping details directly on the checkout page before completing your purchase.
North America
-
United States: 3-5 business days
-
Canada: 7-15 business days
The PetVora Collar Air comes with a 30-day return and refund period, starting from the day after shipment.
- Returns are accepted only if the product is in original, working, and resalable condition (normal wear is acceptable).
- If the device has been activated, the activation fee is non-refundable.
- For returns not caused by product defects, the customer is responsible for:
- Return shipping costs
- Payment processing/transaction fees
- Activation fee (if already activated)
Once approved, PETVORA will provide a prepaid return label, monitor the shipment, and issue a refund within 7-10 business days after inspection.
If the product was purchased outside the official website, please contact the original seller directly.
Collar Air-Product Features
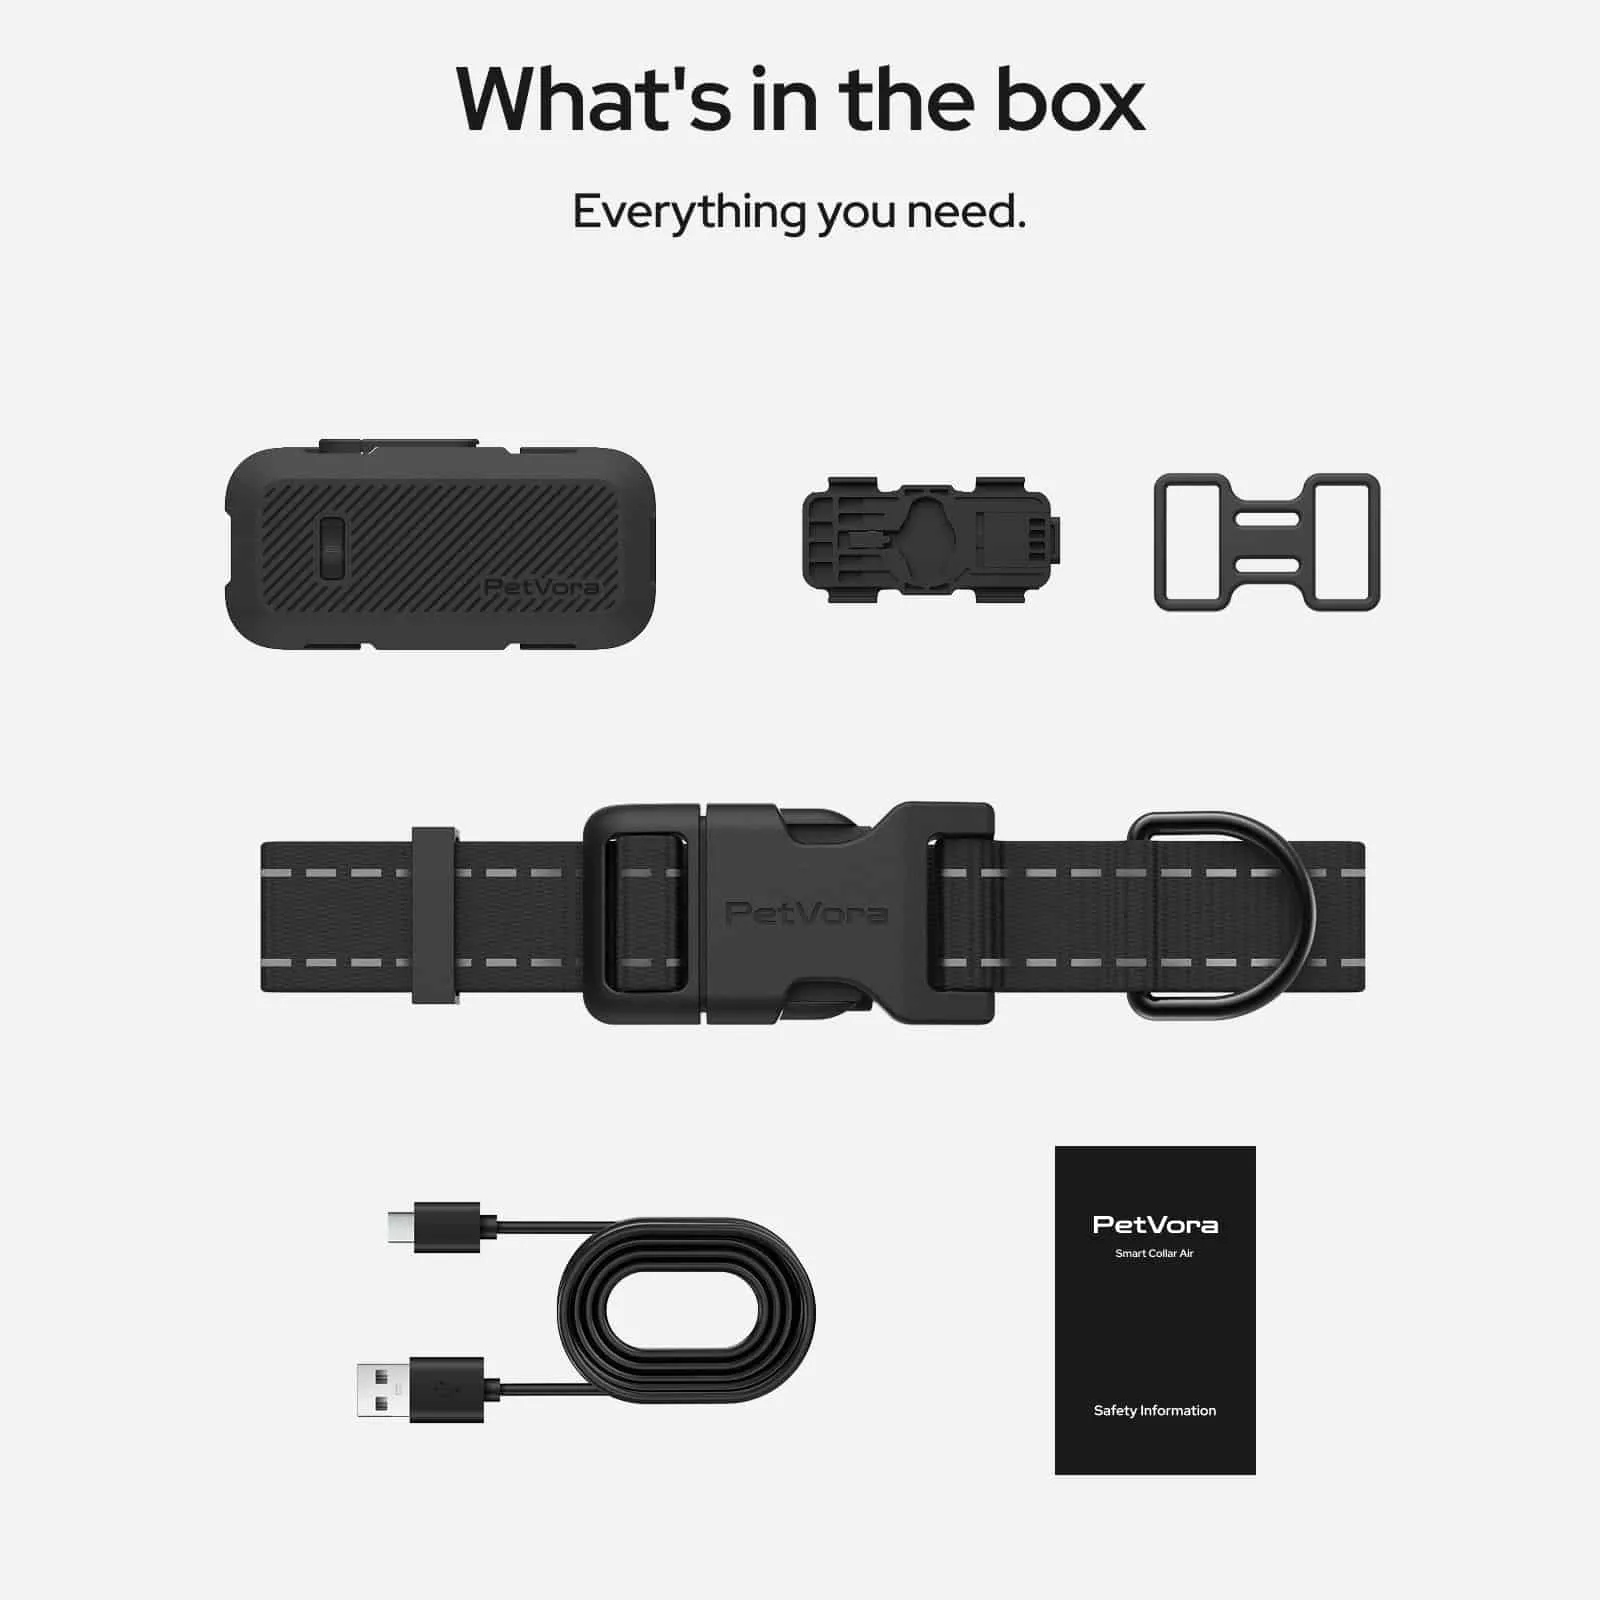
7 pitanjaYour package includes the following items:
• PetVora Collar Air
• Quick-release backplate
• Collar mounting strap
• USB-C Charging cable
• Band for the Collar Air
PetVora Collar Air can only be used for dogs above 4kg (8.8lbs).
M 33cm-46cm (13"-18")
For dogs like Beagles, Bichons, Border Collies, Boston Terriers, and more.
L 43cm-66cm (17"-26")
For dogs like American Bulldogs, German Shepherds, Golden Retrievers, Labradors, and more.
The PetVora Collar Air is a smart collar with GPS tracking, health & activity monitoring, and a built-in AI to answer your questions. As such, it is able to provide real-time GPS location, location history, health and activity data, and virtual boundaries with escape alerts to help you ensure your pet’s safety.
The PetVora Collar Air tracks your pet by combining GPS positioning and LTE communication.
Positioning: The built-in GPS module calculates your pet’s location using petvora signals. For best accuracy, ensure the device has a clear view of the sky.
Communication: Once GPS data is collected, it is sent via LTE to your PETVORA Go app, allowing you to view your pet’s position in real time.
Poor weather or signal obstruction (buildings, metal, etc.) may reduce accuracy.
No. The PetVora Collar Air uses an embedded virtual SIM (eSIM) and does not require a physical SIM card. You only need an active telecom plan to use tracking and network-based features.
You can reach the PETVORA customer support team through the following channels:
Email: support-global@petvora.com
Available Monday to Sunday, 9:00 AM - 9:00 PM (EST)
You can also visit the Help Center / FAQs section on the website for quick answers to common questions.
The PetVora Collar Air supports global GPS coverage, but LTE connectivity depends on regional network compatibility. We currently offer different product versions for different markets (e.g., the U.S. and Europe). Please ensure you purchase the version that matches your region.
Collar Air-Set up & Use
4 pitanjaTo activate your PetVora Collar Air, please follow the steps below:
Steps:
1.Turn on the device - Press and hold the power button for 3 seconds until you hear a short startup chime.
2.Download the PetVora Smart Collar Air app - You can scan the QR code from the user manual or visit our official website at petvora.com to download the PetVora Smart Collar Air app from the homepage.
3Complete activation - Enable Bluetooth on your smartphone, open the app, and follow the in-app instructions to pair and activate your device.
To turn on: Press and hold the power button for about 3 seconds until you hear one “beep” sound and see a single white flash - your device is now on.
To turn off: Press and hold the power button for about 3 seconds again until you hear one “beep” sound and see two white flashes - the device is now off.
Steps:
Open the waterproof cover on the charging port.
Insert both ends of the included charging cable - one into your PetVora Collar Air and the other into a power adapter.
Plug the adapter into a powered outlet.
When charging starts, the LED indicator will flash white light. A solid white light indicates the battery is fully charged.
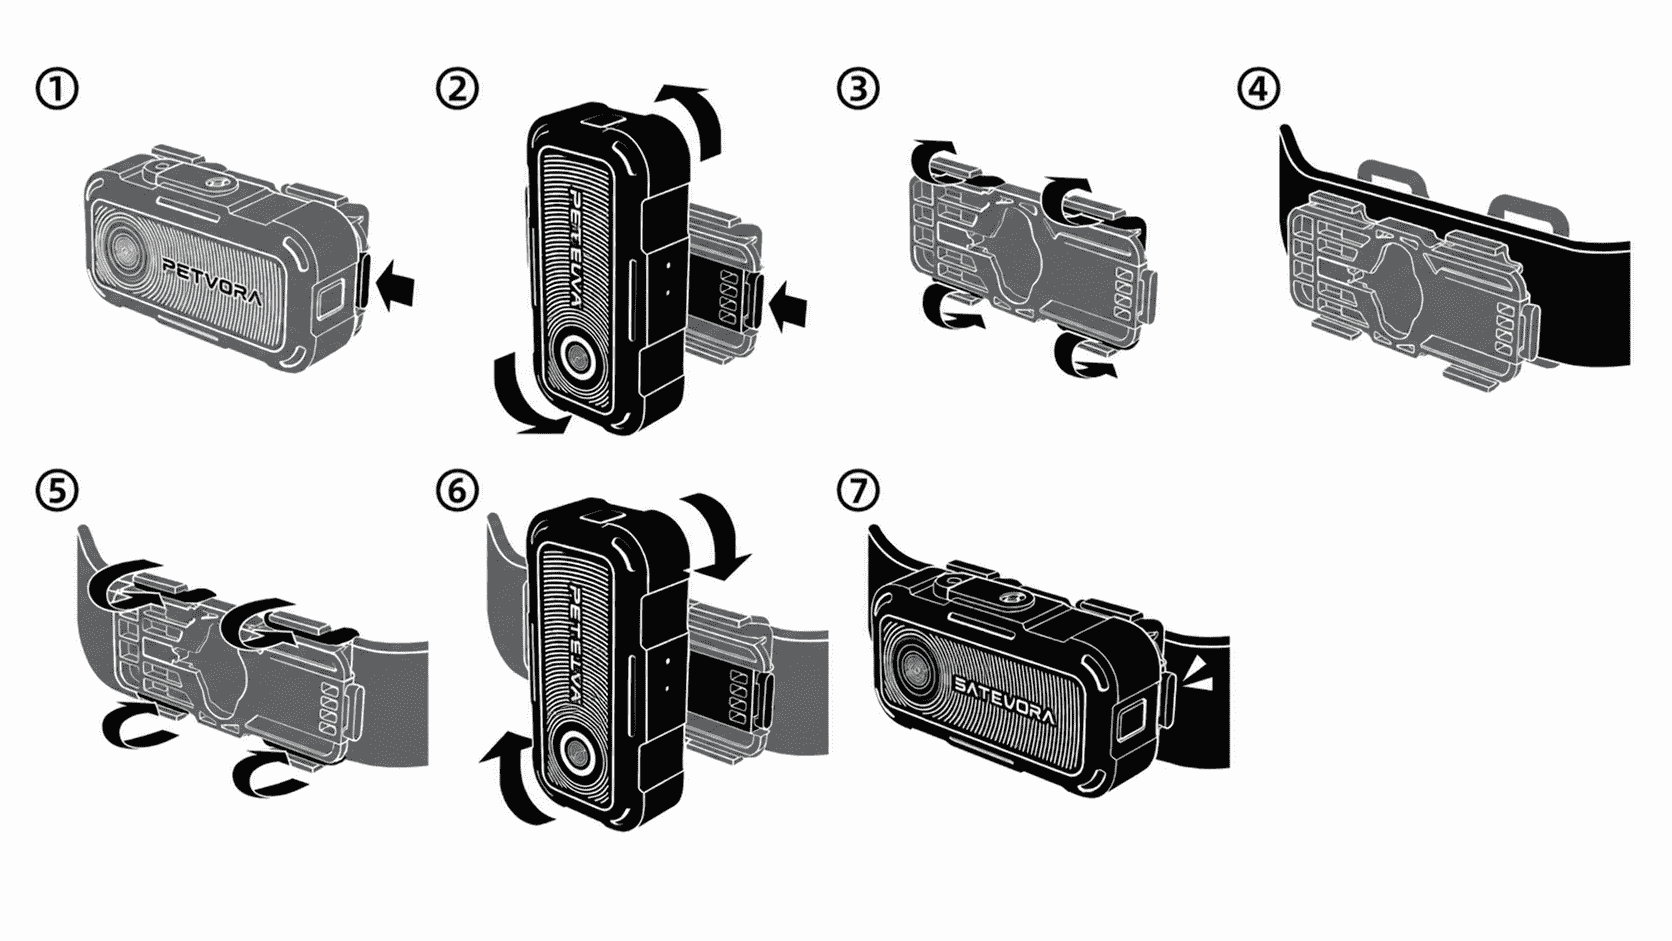
After activation, prepare the provided band or your own collar (your own band must be 25mm or less in width).
Steps:
1.Press and hold the button on the backplate to disengage the locking mechanism, rotate the device 90°, and detach the device from the backplate.
2.Remove the strap from the backplate. Position the backplate against the band and fasten the backplate to it using the strap.
3.Insert the device into the backplate at a 90° angle and rotate it until the locking mechanism clicks into place.
4.Adjust the size to fit your pet comfortably (there should be space for two fingers between your dog's neck and the band) and fasten the band onto your dog's neck.
About PetVora Smart Collar Air App
5 pitanja1.Open the PETVORA Go App
2.Go to the Manage tab and select “Add Pet.”
3.Follow the instructions to add and assign a pet to your Collar Air.
How to delete/unassign a pet profile:
1.Open the PETVORA Go App
2.Go to the Manage tab
3.Open the pet’s profile and select “Delete Profile” or “Unassign from current device.”
To log in:
1.Open the PETVORA Go app.
2.Follow the prompts to enter your email and password.
3.If you don’t see your device, ensure you are logging in with the correct email address.
To log out:
1.Open the PETVORA Go app.
2.Go to the “Account” tab.
3.Tap your account and select Log Out.
The PetVora Smart Collar Air app is free to download from:
[Google Play Store] (Android 10.0 or newer)
[Apple App Store] (iOS 16.6 or newer)
Important: Always download from official app stores to avoid modified or unsafe versions.
The app requests certain permissions to ensure proper operation and user convenience:
• Location: To show your position relative to your pet.
• Bluetooth: To maintain short-range communication and improve tracking precision.
• Camera & Photos: To personalize your pet’s profile photo.
Notifications & Network Access: To receive real-time alerts and sync your data.
PETVORA only requests permissions essential for functionality and never accesses personal data without consent.
You’ll receive notifications for:
• Virtual Boundaries: Alerts when your pet enters or exits a safe zone.
• Low Battery & Device Status: Reminders to charge or maintain your PetVora Collar Air.
To ensure proper delivery, confirm notifications are enabled both in your phone’s system settings and within the PETVORA Go app.
Collar Air-Troubleshooting
4 pitanja
When your Collar Air shows a GPS icon with a slash through it or stops updating its location, it usually means it’s unable to obtain a valid GPS signal or transmit location data via the cellular network. This commonly happens indoors, in dense urban areas, or when the device hasn't been restarted after a signal loss.
Steps:
1.Go outdoors with the Collar Air in hand and stay in an open area for at least 10 minutes to allow GPS petvoras and the cellular network to reconnect.
2.Open the PetVora Smart Collar Air app and check if the GPS signal bars appear or if the location begins updating. If it updates, the issue was caused by a poor indoor signal.
3.If it still doesn’t update, please reset: hold the power button for 10 seconds until you hear the restart sound and see the white LED flash.
4.After restarting, press the power button twice to check the LED status - "Green/yellow means working, red or no light indicates connection failure.
5.Repeat the outdoor walk and enable LIVE Tracking in the Map tab to force a fresh GPS + network update.
If still unresolved, keep the Collar Air powered ON and contact our support team with the steps you have already tried.

This means the device is temporarily unable to transmit data to the PetVora Smart Collar Air app due to cellular network issues - it may still know its location, but cannot send it to your phone. This is not a power issue or data loss.
Steps:
1.Move outside or to an open space - the device will often reconnect automatically once it detects stronger cellular coverage.
2.If the status doesn’t change, perform a hard reset by holding the power button for 10+ seconds until the white LED flashes and the startup sound plays.
3.Press the power button twice. A green/yellow LED means reconnected, while a red light indicates it still cannot access the network.
4.Take the device outside for another 10-minute walk and tap Live Tracking Mode in the app to force a real-time update.
If the Collar Air still shows Offline, leave it turned ON and contact support - do not power it off, as our diagnostics require an active signal.
If the LIVE Tracking button is grayed out or location updates are not live, it usually means the Collar Air is in battery-saving mode (At-Home Mode) or has insufficient GPS or cellular signal to push live data - even if it appears “Connected”.
Steps:
1.Check if you are inside an At-Home Mode(LIVE Tracking only activates indoors if the phone is close enough to the device via Bluetooth). If you are, once your pet leaves the zone, the system should automatically switch to GPS + cellular.
2.Make sure your phone itself has stable internet (Wi-Fi or LTE); otherwise, it won't receive updates.
3.Take the device outdoors and wait 1-2 minutes with a clear view of the sky to ensure both GPS and cellular locks are acquired. Then refresh LIVE Tracking Mode to connect directly
4.If it is still not working, restart the device (hold the power for 10 seconds) and repeat the outdoor test.
If Live Tracking mode cannot start after a full reset + outdoor test, leave the device powered on and contact support for remote diagnostics.
This is almost always caused by GPS interference indoors. When your pet is inside, roofs and walls can interfere with GPS signals - causing the location to "drift" outside your Virtual Boundary, even if your pet hasn't actually moved.
What you can do to prevent this:
1.Set up an At-Home Mode - the collar will use Wi-Fi instead of GPS indoors, eliminating false alerts and saving battery.
2.Increase the size of your Virtual Boundary to provide more buffer space.
3.Avoid using LIVE Tracking indoors, as it increases the chance of the GPS location “drift”.
4.Make sure multiple Virtual Boundaries do not overlap.
5.Keep Bluetooth + Location Services enabled on your phone for better nearby accuracy.
If issues continue, contact support and share the exact date and time of the false alerts - this helps us investigate faster.